


We've all been there.
A fan posts a borderline negative or offensive post on our Facebook page.
What do we do?
- Hide the post?
- Delete it?
- Delete it & ban the fan?
These are the questions we ask ourselves when managing posts by fans. And make no mistake -- managing these posts is an important part of running a successful page.
I'd like to use this blog post to dive in & show how you set up your page & properly manage posts by your fans.
How to Manage Posts by Fans on Your Facebook Page
Let's start with your page's settings & then move on to the active management of fan posts.
We'll cover the following steps:
- Setting up your fans' "Posting Ability"
- Setting up your fans' "Post Visibility"
- Setting up Proactive Moderation
- Moderating posts by fans
STEP 1: Set up your fans' "Posting Ability"
1. Click "Edit Page" & then "Edit Settings" (above your cover photo)

2. Click "Edit" to the right of "Posting Ability"
![]()
3. Choose to allow/disallow others to post on your timeline
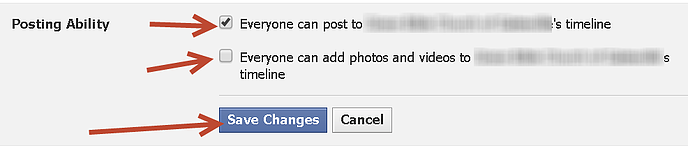
The first checkbox allows fans to post text to your timeline -- the 2nd allows photos or videos.
If you don't want to allow any posts, just uncheck both options.
For large pages that generate a lot of spam from fans, it may be a good idea to ban all fan posts.
But for small businesses, you'll definitely want to allow fan posts -- because it adds a community feeling to your page & lets people know you care.
4. Click "Save Changes"
Now you need to decide whether fan posts will be visible to other fans on your Timeline.
STEP 2: Set up your fans' "Post Visibility"
1. Click "Edit" to the right of "Post Visibility"
![]()
2. Hide or Allow posts by others
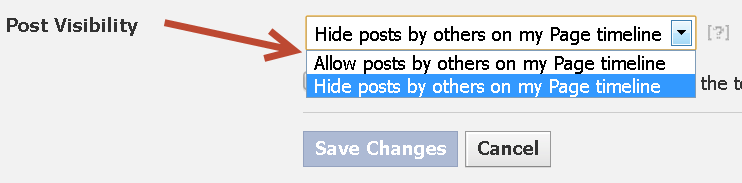
This causes posts by others to either immediately show up on your Timeline -- or to hide them until you approve the posts.
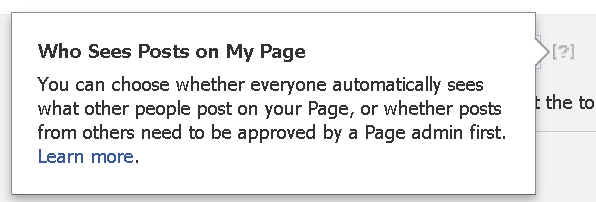
If you click on the question mark, Facebook explains it:
3. Choose whether to highlight posts by others above your page's posts

Selecting this will add a box on the upper right column of your timeline called "Recent Posts by Others". It's a great way for everyone -- including page managers -- to see what fans have posted.
Here's what the box looks like on your timeline:
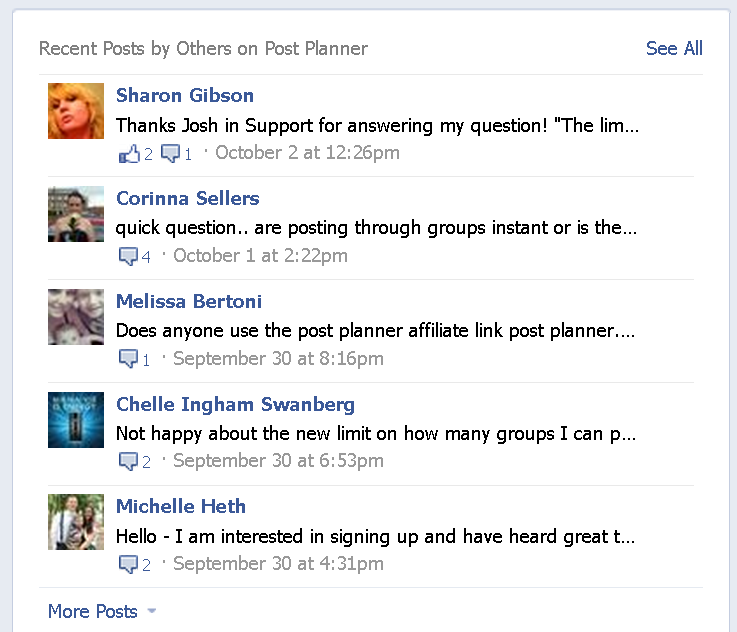
If you un-check the box, posts by others will not be visible to page managers or visitors unless they click on the "Highlights" dropdown arrow (just below your apps).

4. Click "Save Changes"
STEP 3: Set up "Proactive Moderation"
Facebook offers 2 tools to page owners for proactively moderating content on your page.
- Moderation Blocklist
- Profanity Filter
Moderation Blocklist
1. Click on "Edit Page" and then "Edit Settings" above your cover photo
2. Click the "Edit" link right of "Page Moderation"
![]()
A box will open up where you can add any term you wish to block (separated by commas).
3. Enter both the singular & plural forms of the word, as shown below
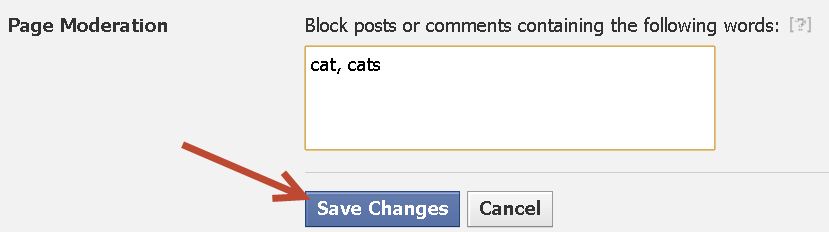
4. Click "Save Changes"
You can unblock posts that contain these blocked words by going to your Activity Log & selecting to unmark as spam.
For comments that have included these words, you'll need to find the comment then mouse over it & click the X that appears.
Profanity Filter
You can now setup the profanity filter in a similar fashion.
1. Click "Edit Page" and then "Edit Settings" above your cover photo
2. Click on the Edit link right of "Profanity Filter", or simply click on Profanity Filter.
Doing so will open this selection:
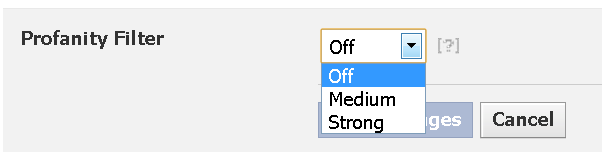
3. Choose Off, Medium, or Strong
4. Click "Save Changes"
Unfortunately, Facebook does a poor job of defining the differences between Medium & Strong.
All they tell us is:
You can choose whether to block profanity from your Page, and to what degree. Facebook determines what to block by using the most commonly reported words and phrases marked offensive by the community.
So choose what you block wisely.
STEP 4: Moderate Posts by Fans
If you've allowed fans to post on your page, it's time to talk about managing those posts.
You'll need to:
- Reply to posts
- Delete spam
- Delete hate speech or abusive posts
- etc.
In my opinion, the worst thing you can do is allow people to post to your page & then NEVER respond to any posts!
The "Posts by Others" box at the top of your timeline makes it super quick & easy to manage these posts.
And there are a few options on this box to choose from.
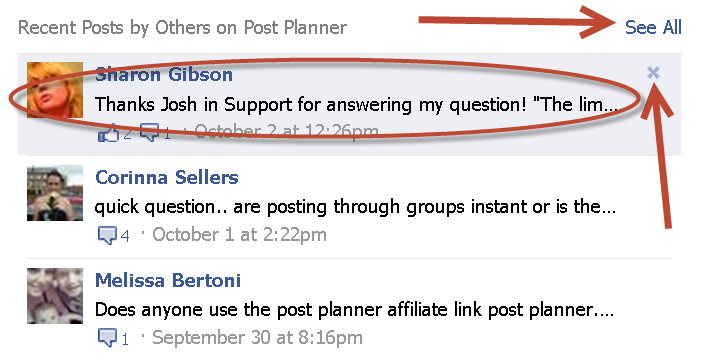
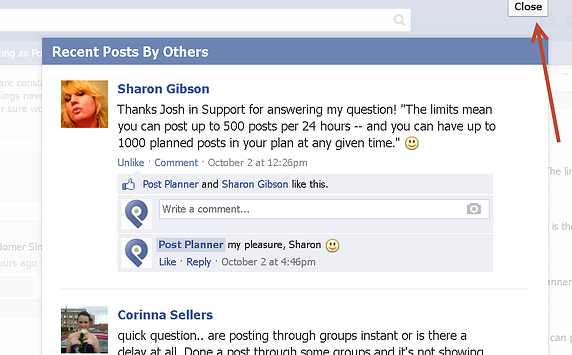
1. See All -- if you click this link, a lightbox will open allowing you to scroll through every post made by others on your page. Then you can reply/comment on/delete these posts.
Once you're done, click "Close" or simply click outside the box.
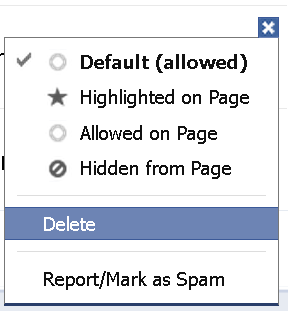
2. Delete a post -- in the image above, you see the "x" with an arrow pointing to it. If you click this "x", you'll get prompted to delete or hide this post.
- Deleting it means it's gone for good
- Hiding it means only that person or page admins can see it
You can always reverse your selection if you decide to hide a post.
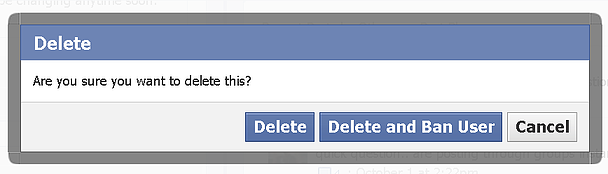
If you choose to delete a post, you're also given the chance to ban the user -- if they are spamming your page or abusing your page, for example.
One other option is as follows:
Instead of clicking "See All" you can also just click on any of the posts you want to reply to. This will open the same large lightbox above -- but the post you clicked on will be the top post.
If you chose to NOT have the "Recent Posts by Others" box on your page, you & your fans will have to go to "Posts by Others" in the "Highlights" dropdown to see basically a timeline version of posts from other people.
As a page manager, this makes it rather difficult to effectively manage posts.
So choose the "Recent Posts by Others" box!
It's Up To You!
Whether you choose to allow fan posts on your page or not is completely up to you.
There is no right or wrong setting -- every page is different.
I will say that on most pages I visit, I prefer to see posts allowed -- and I prefer to seem them in the "Recent Posts by Others" box.
For example, sometimes I may have a question about the product & it's already been answered on one of these posts -- which saves me & the page manager time!
The other thing to keep in mind is the news feed algorithm on Facebook (formerly & still called "EdgerRank" by some) will give favor to pages that allow fan posts. So keep that in mind.
It might not mean a lot, but any help is important!
Do you allow others to post on your page? Why or Why not?


ViewHide comments (3)