
Feel like you’re constantly guessing on social media?
You’re not alone.
Too many creators and marketers post on the fly — chasing trends, guessing what works, and hoping something sticks. But if you want real results (more engagement, more leads, and more time back in your day), you need a clear strategy.
That’s why I created this free, fill-in-the-blank Social Media Strategy Template.
Just here for the download?
No problem. Here it is.
If you want more guidance on how to use it, along with insider tips on utilizing social media tools to speed things up, read on.
In this article, I’ll walk you through how to complete each section step-by-step so you can build a content plan that’s focused, repeatable, and tailored to your business goals.
Feel free to skip around:
- 1. Define your business objectives
- 2. Establish your brand voice & visual guidelines
- 3. Audit your current social media performance
- 4. Analyze your competitors
- 5. Build audience profiles & map their pain points
- 6. Define your content pillars
- 7. Plan your posting cadence for each channel
- 8. Create your topic × format matrix
- 9. Assign workflow & team responsibilities
- 10. Use the social profile optimization checklist
- FAQ
1. Define your business objectives
Before planning what to post, when to post, or which platforms to use, you need to understand why you're doing it in the first place.
Your social media strategy is only as strong as the goals driving it. And vague goals like “grow our following” or “get more Likes” just won’t cut it. That’s why the very first section of this template starts with Business Objectives.
Without clear goals, your social media is just noise.
Whether you're a solopreneur, agency, or in-house marketer, your time is limited. Knowing exactly what you're trying to achieve helps you focus your efforts, measure success, and make smarter content decisions. It’s the difference between posting for the sake of it vs. posting with a purpose.
For each objective, you’ll write out the following:
- Objective – Start broad (e.g., “Increase brand awareness,” “Generate leads,” or “Drive traffic to product pages”).
- SMART KPI – Turn that objective into a Specific, Measurable, Achievable, Relevant, Time-bound (SMART) goal. Example: “Gain 100 followers per month.”
- Timeframe – Be realistic. Is this a 30-day goal? A 6-month campaign?
- Owner – Who’s accountable for tracking and hitting this?
Here’s what this’ll look like in the template:

Pro Tip: Don’t set 10 goals. Focus on your top 2–3 that'll move the needle. Then build your content and posting cadence around those.
2. Establish your brand voice & visual guidelines
This section is all about creating consistency in how your brand sounds, looks, and feels on social media.
You’ll fill out three columns:
- Element – The part of your brand identity you're defining (like tone, vocabulary, or formatting)
- Guidance – Your specific instructions or preferences for that element
- Example – Drop an example (or a few) of posts that capture what you’re looking for in each particular element.
Here are some example elements that you should consider adding to your brand voice and visual guidelines template:
- Tone of voice – Are you friendly and casual? Professional but playful? Authoritative and educational? Write a 1–2 sentence description that defines your tone.
- Do/Don’t vocabulary – Include a list of words/phrases you always use (like “clients” instead of “customers”), and those you avoid (like slang or buzzwords that don’t fit your brand).
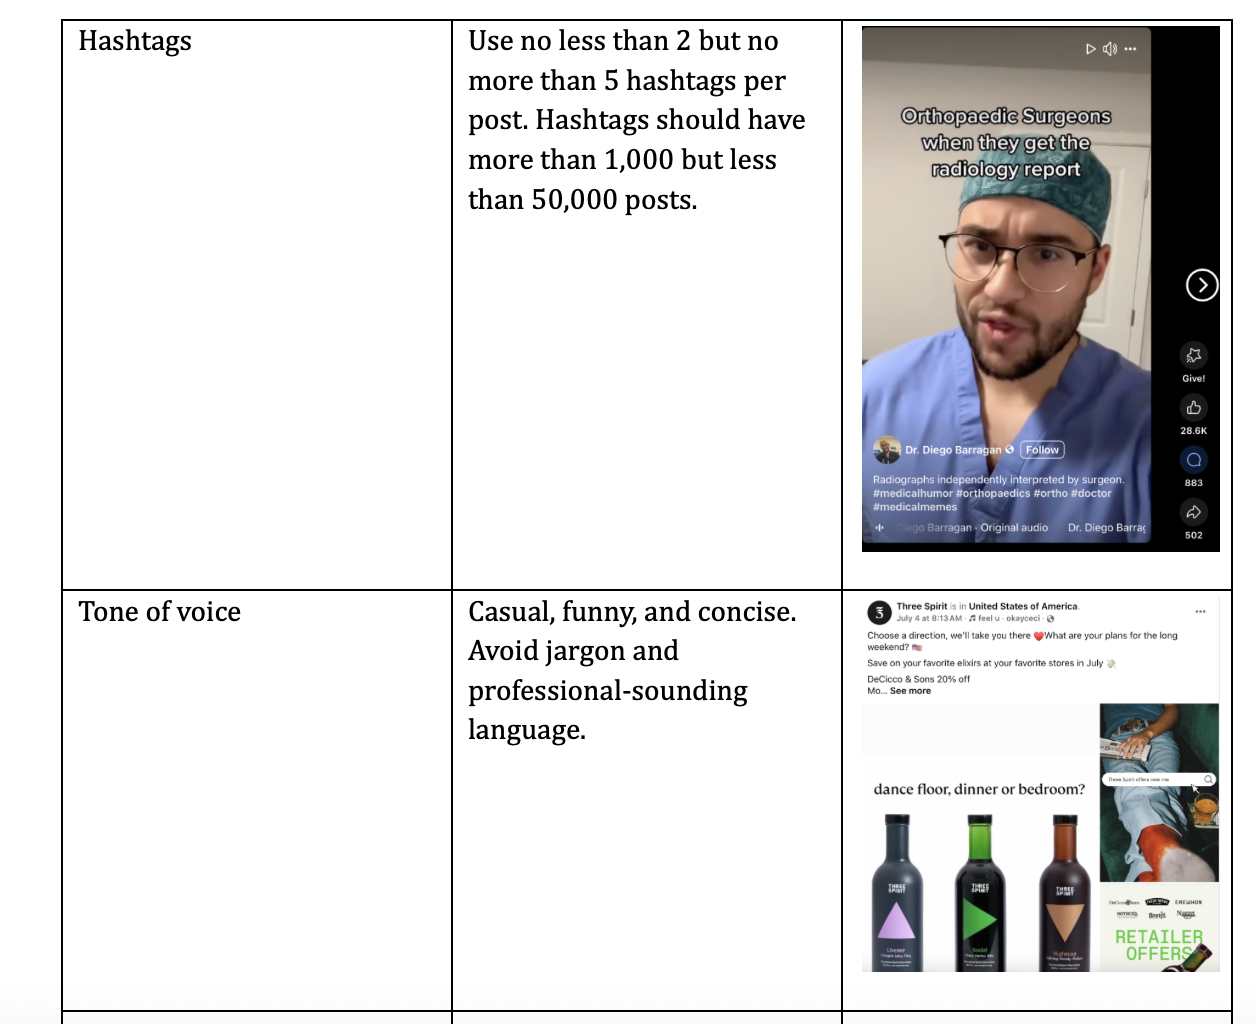
- Image rules – Detail aspects such as preferred image ratios, filters, color palettes, or logo placement. Is every photo edited the same way? Do you use bold, minimal, or meme-style graphics?
- Visual style – Think beyond colors. Are your visuals clean and white-space heavy? Do you utilize a significant amount of user-generated content? Stock photos? Hand-drawn illustrations?
- Formatting preferences – Do you use emojis? Capitalization rules? Line breaks for readability? Bullet points or paragraph blocks? Include examples if possible.
- Hashtag use – How many hashtags do you use per post? What types of hashtags do you use/avoid?
Here’s an example of what the template will look like when you fill in a few of your rows:
3. Audit your current social media performance
Before you can see if your social media strategy is improving your performance, you need to know where you're starting.
This section of the template helps you gather data on how your social media channels are performing currently. It's your baseline.
Trust me, when you look back in 90 days, you’ll want to see the growth.
If you don’t know what’s working (or not), you’ll waste time guessing. Tracking performance now provides a clear starting point, enabling you to set more effective goals, make informed decisions, and demonstrate what’s driving results.
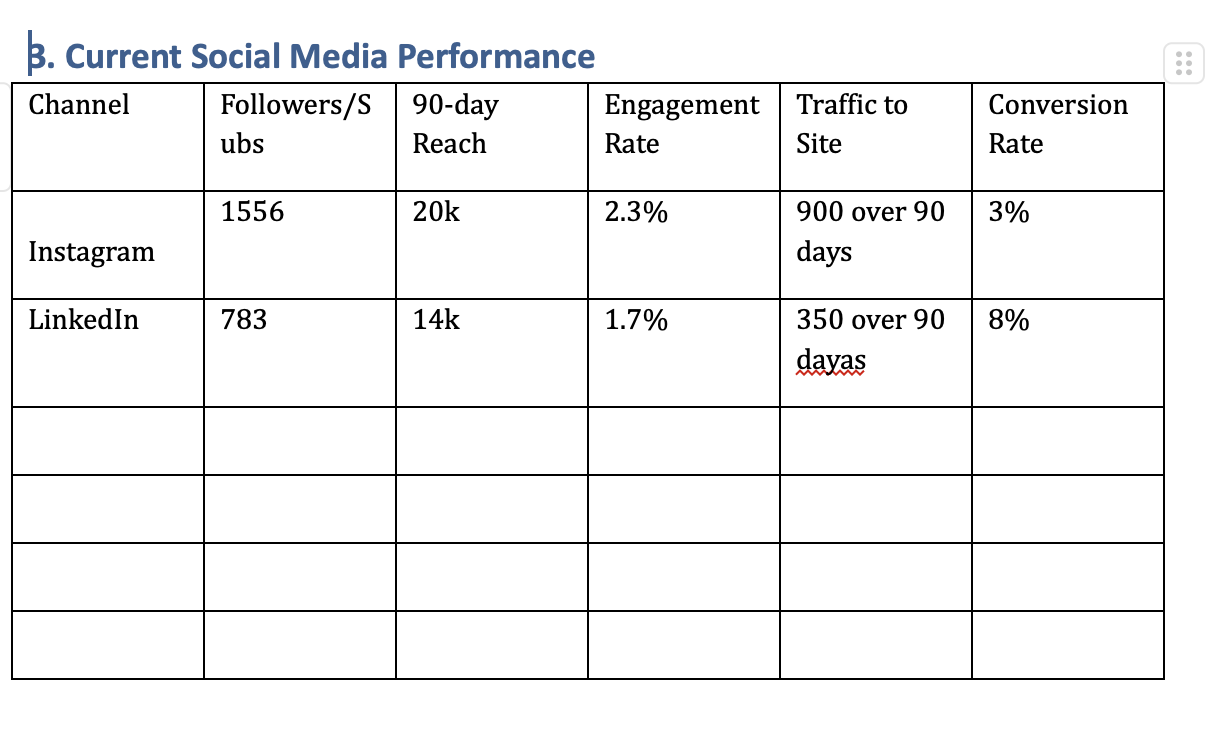
For each channel (Instagram, Facebook, LinkedIn, etc.), fill in:
- Followers/Subscribers – Your current audience size (Find this info on your social profiles)
- 90-Day Reach – How many total people have seen your posts over the last 3 months (Find this info in the analytics tab of your social profiles)
- Engagement Rate – Likes, comments, shares, saves as a % of reach (Also found in the analytics tab of each social profile)
- Traffic to Site – How much web traffic came from this platform (Find this info in your website's Google Analytics)
- Conversion Rate – Of the people who clicked through to your site, how many signed up, bought, or took action on your CTA? (You should be able to find this in your website analytics, depending on the platform you use.)
Here’s what this section should look like in the template when you start filling it out:
Pro Tip: Pull this data at the beginning of every quarter and track changes, allowing you to see patterns over time.
4. Analyze your competitors
Your competitors are handing you a roadmap. You just have to know what to look for.
This section of the template helps you break down how your top competitors are showing up on social media: what’s working for them, where they’re falling short, and what gaps you can fill.
Competitor research reveals the content your audience is already engaging with, providing inspiration to do it better. It also helps you spot opportunities they’re missing, so you can stand out instead of blend in.
(It’s not about copying. It’s about learning.)
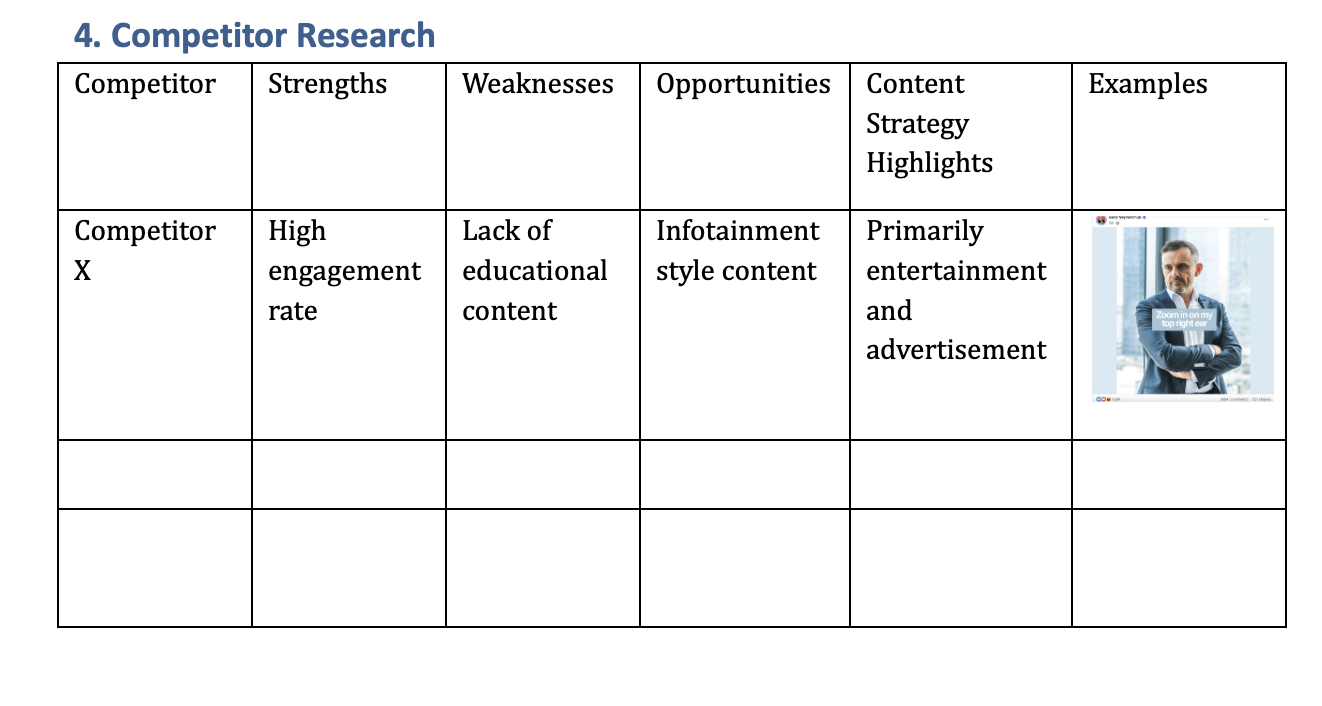
For each competitor, fill in:
- Strengths – What they’re doing well (great visuals, frequent posting, high engagement)
- Weaknesses – What they’re missing (inconsistent branding, poor CTA, low variety)
- Opportunities – Gaps you can fill or trends you can capitalize on
- Content Strategy Highlights – What types of content they rely on (memes, reels, educational posts, carousels)
- Examples – Grab links or screenshots of standout posts for reference
Here’s what the section should look like when it’s filled out:
Want an easy way to spy on your competitor’s best content?
Create a Content Stream in Post Planner using your competitors’ Facebook, LinkedIn or RSS feeds. Post Planner will surface their top-performing posts so you can:
- Instantly see what’s resonating with their audience
- Use those ideas to inspire your unique spin
- Spot trends early (before your competitors even notice them)
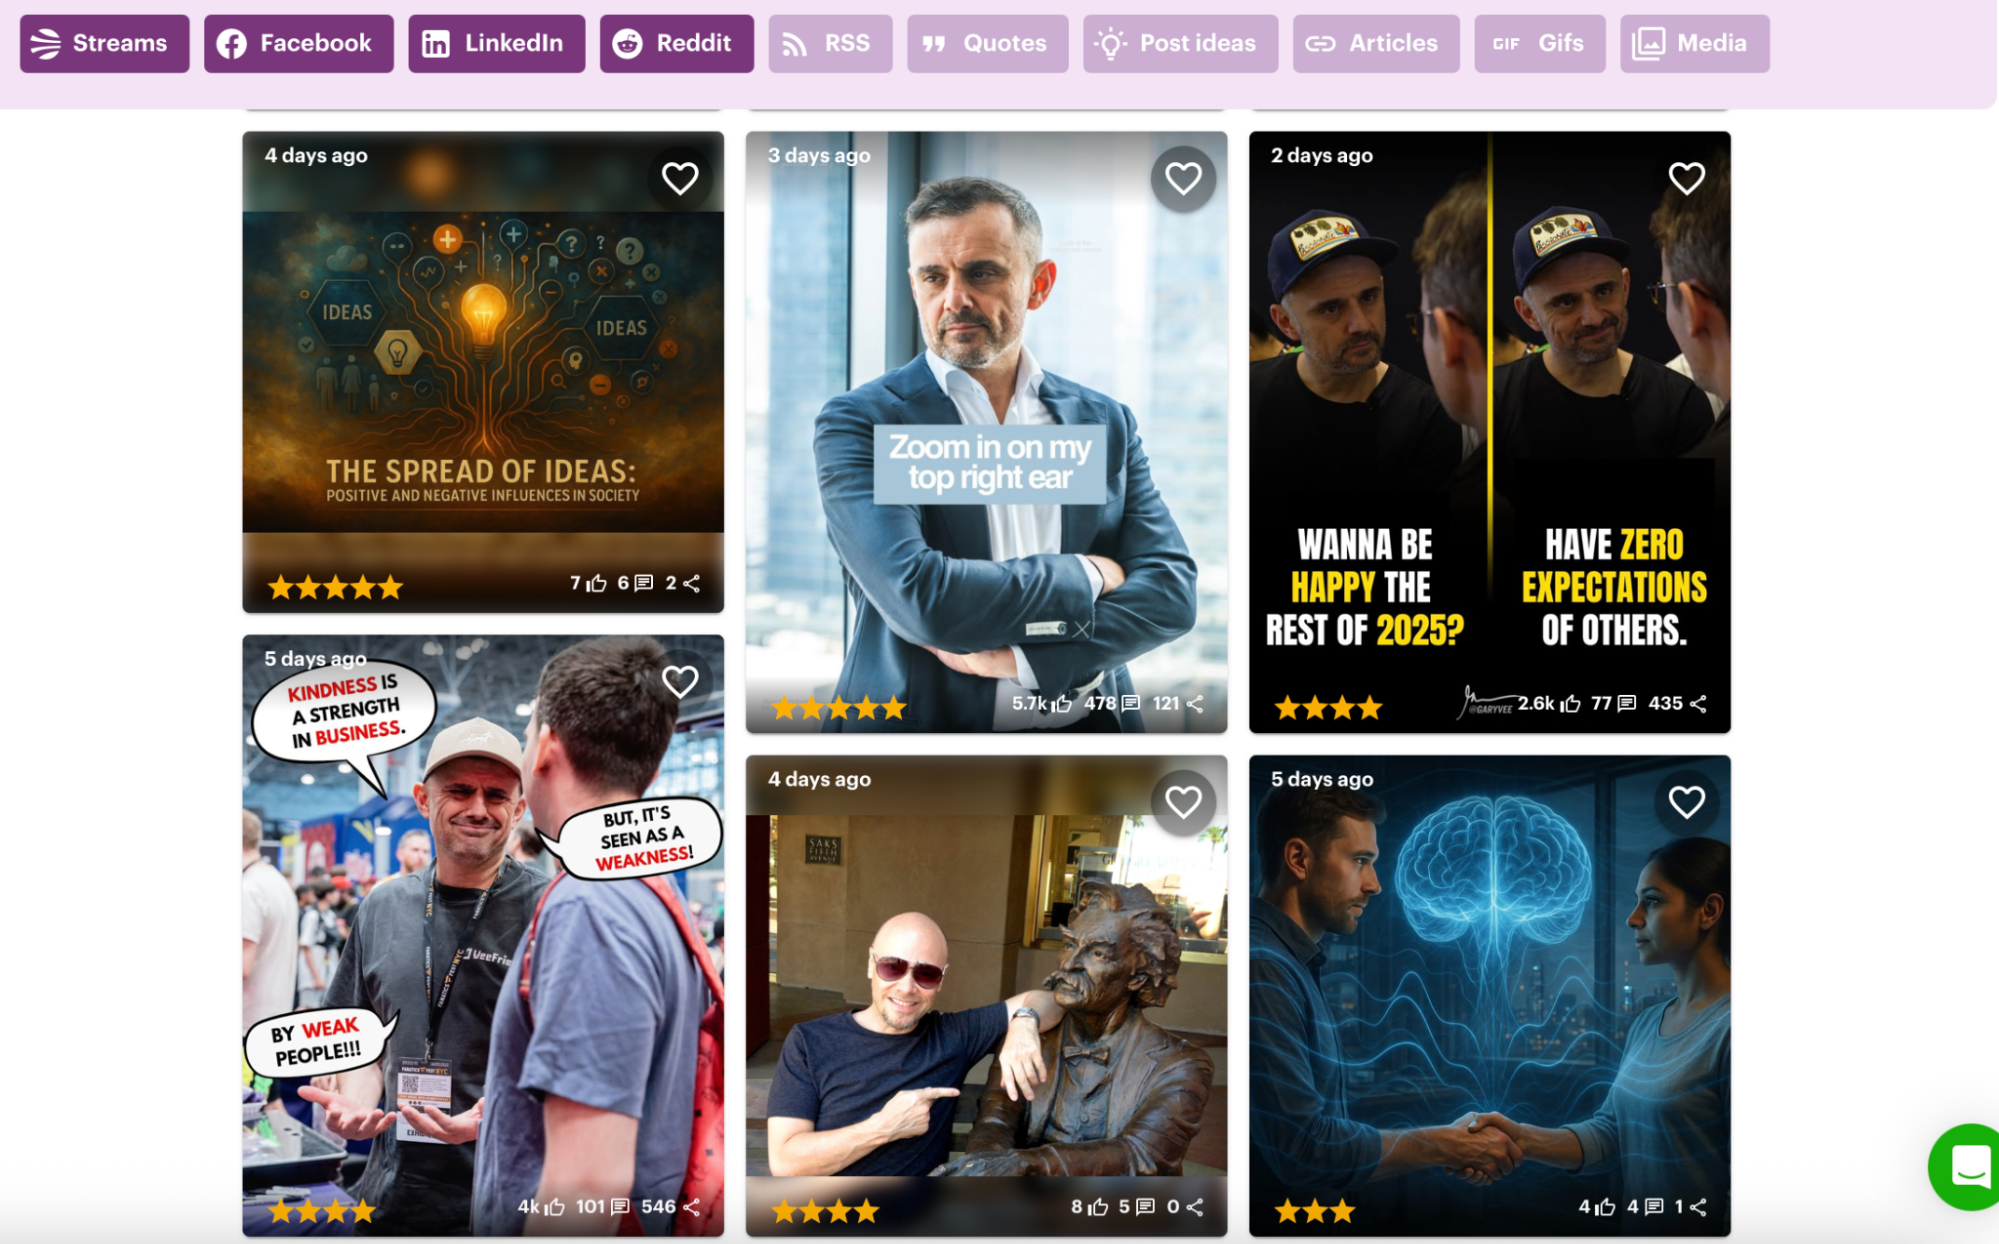
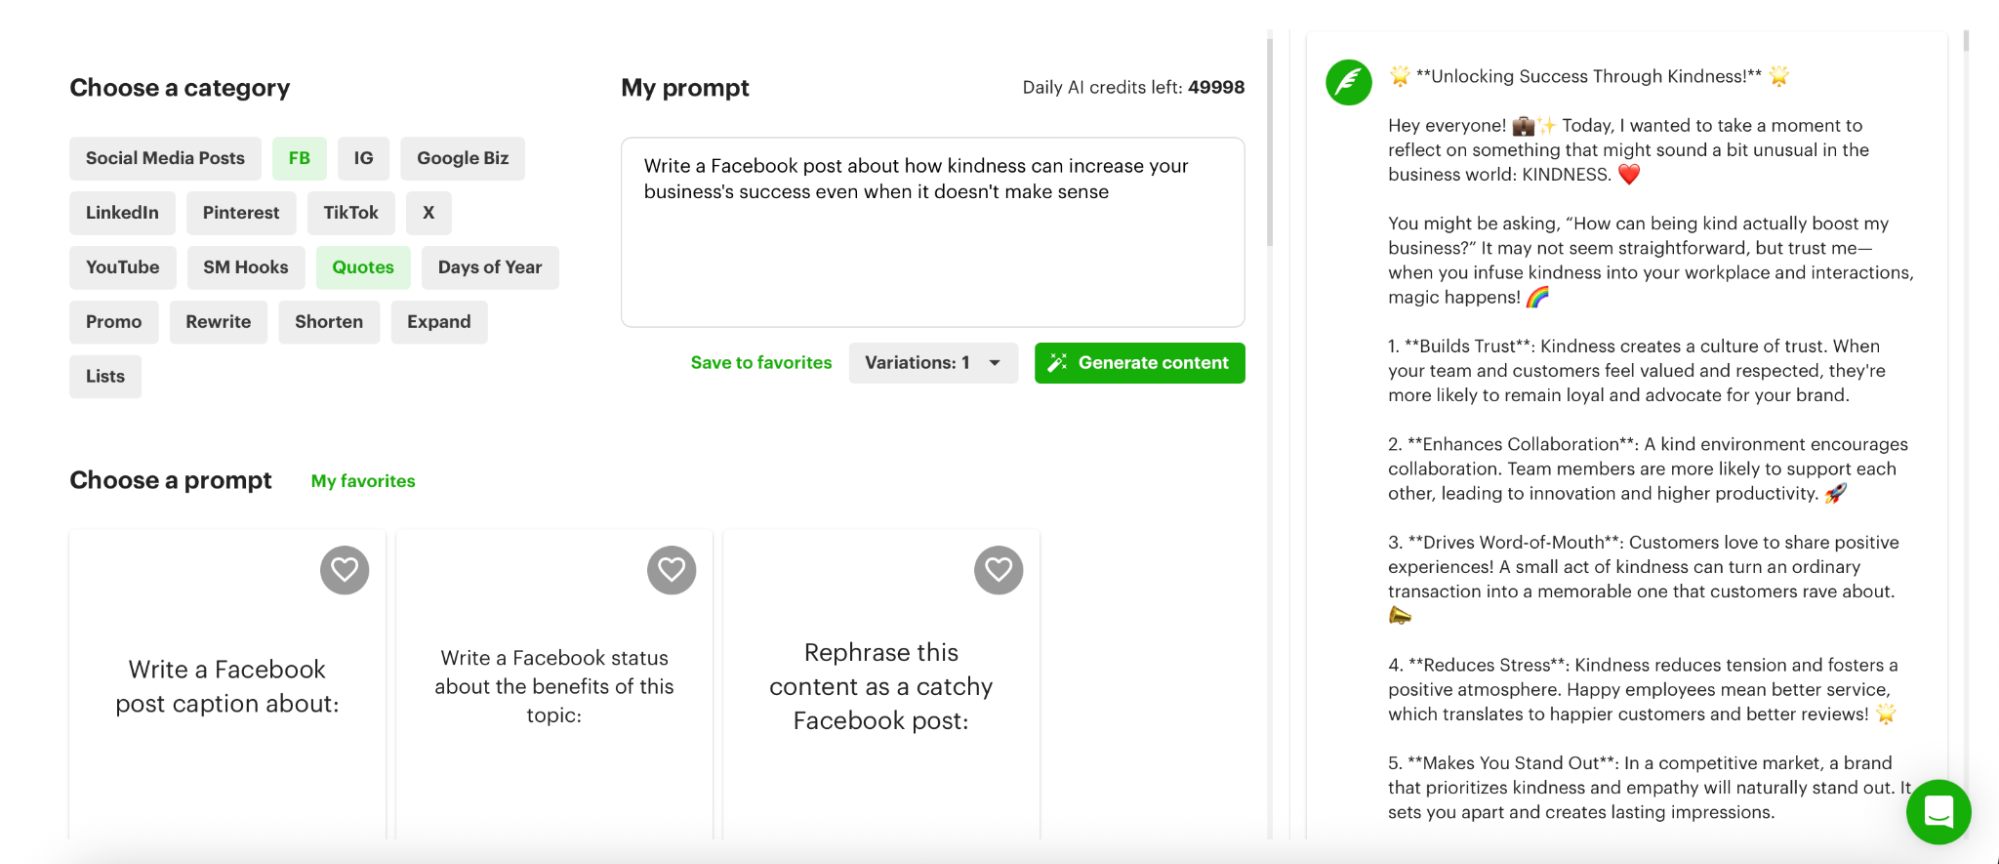
You can even favorite top-performing competitor content to save it for later, or repurpose the concept in your voice using Post Planner’s AI Writer.
Your competition already did the testing. Use their wins (and flops) to sharpen your strategy and stay one step ahead.
5. Build audience profiles & map their pain points
Before you create content, you need to know who you’re creating it for.
This section of the template helps you segment your audience, understand what they’re struggling with, and match your messaging to the problems they care about. Because let’s be real, if your posts don’t speak to their pain points, they’ll scroll right past them.
When you understand your audience deeply, your content feels relevant, helpful, and impossible to ignore.
That’s what builds trust and drives action.
Each row in this section represents a customer segment. For each one, map out:
- Segment – What audience you’re targeting (Marketers, entrepreneurs, travel bloggers, etc.)
- Demographics – Age, location, job title, business type, etc.
- Psychographics – Values, beliefs, motivators, lifestyle preferences
- Pain Points – What’s frustrating them right now? What’s stopping them from reaching their goals?
- Product Match – Which part of your product or service solves that pain?
- Key Message – A one-liner or theme you can build content around that speaks directly to them.
Here’s what this section will look like when you start filling it out:

Want to target these audience segments even more precisely?
Use Post Planner’s Buckets to organize content by audience or topic. You can:
- Create one bucket for each persona (e.g., "Marketing directors" or "Founders")
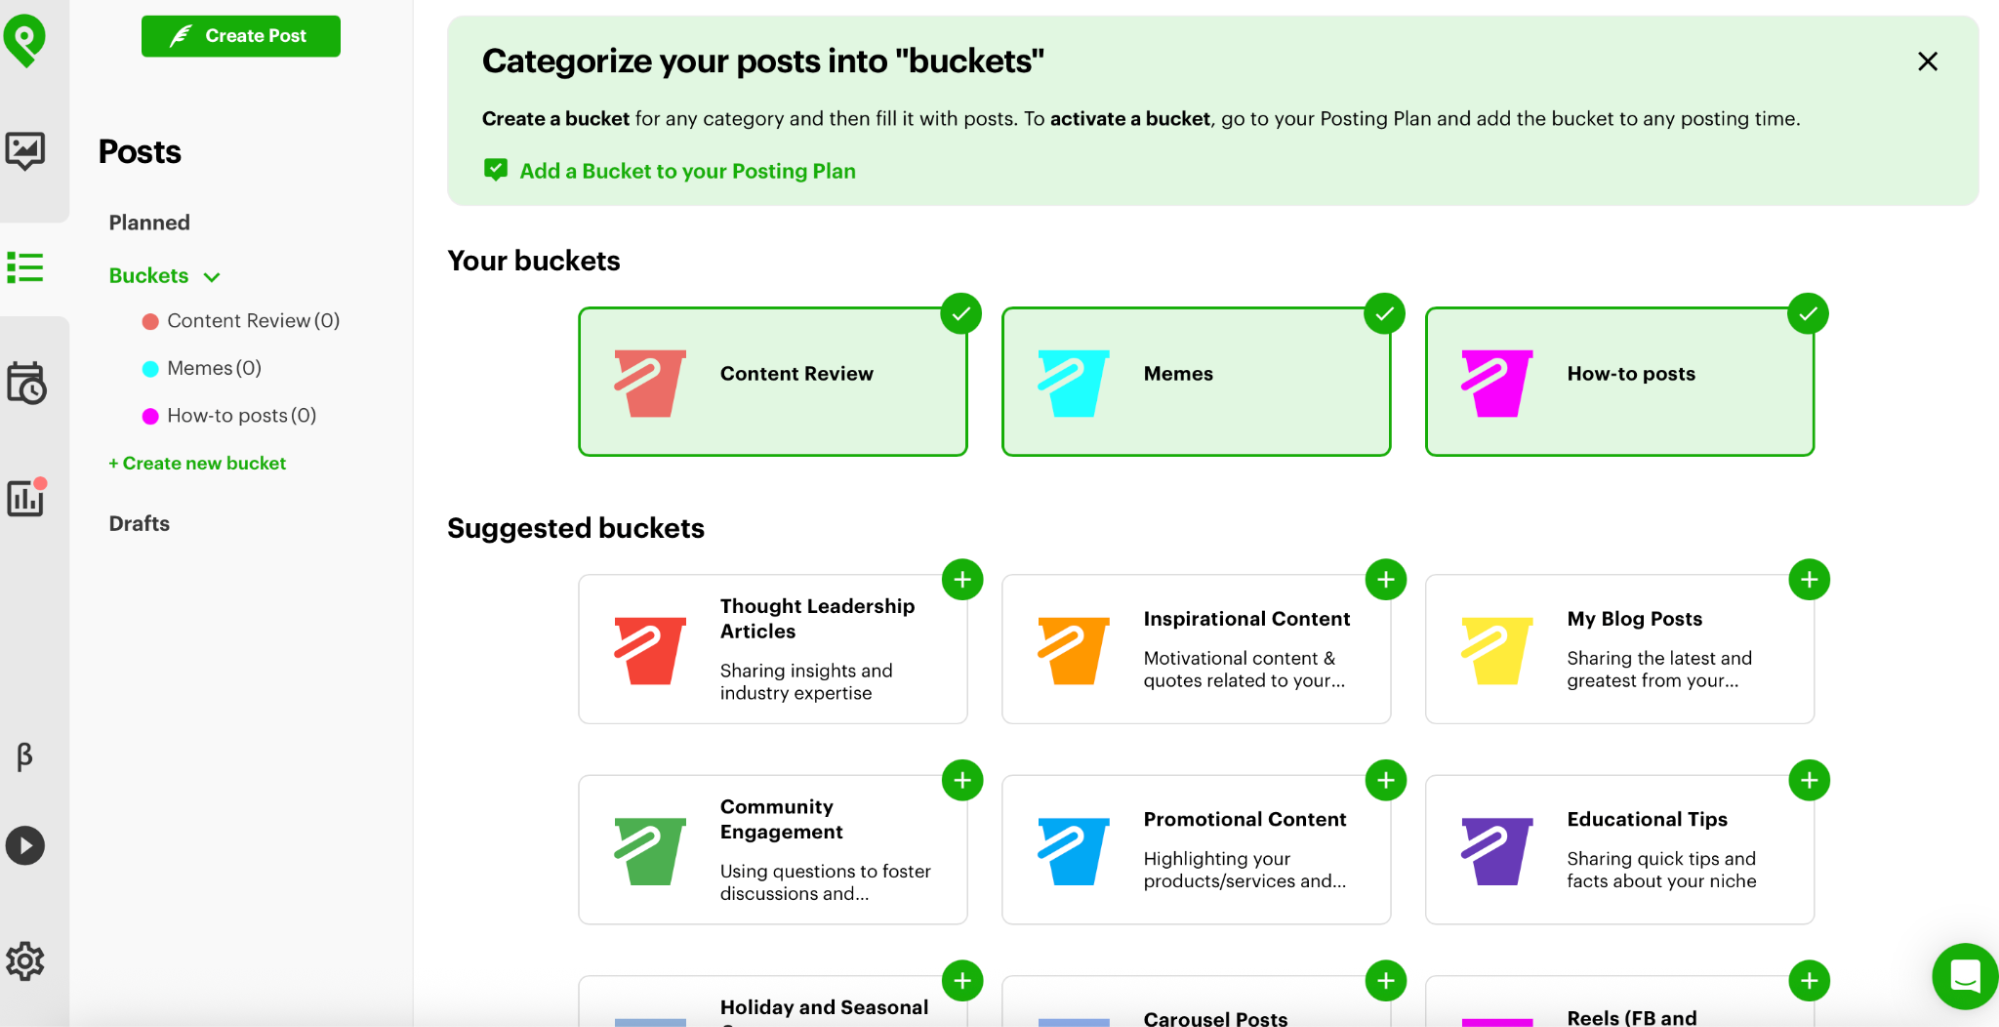
- Fill them with tailored posts that speak to their specific struggles
- Set your Posting Plan to rotate buckets automatically so you're always serving the right message to the right people

Pro Tip: Interview customers, read reviews, check Quora or Reddit threads, and look at competitor comments. The words your audience uses are often better than anything you could write yourself.
6. Define your content pillars
If your feed feels random, scattered, or inconsistent, content pillars are the solution.
Your content pillars are the 3–5 core themes you’ll post about regularly. They keep your strategy focused, help you stay consistent, and make it easy to generate content ideas that support your goals.
Content pillars are the foundation of a smart strategy. They connect your business objectives (what you care about) with your audience’s interests (what they care about).
That overlap is where extraordinary content lives.
For each pillar, write out:
- Pillar – A short name for the theme (“Tips,” “Behind the Scenes,” “Client Wins”)
- Purpose – Why this content exists. Is it to build trust? Teach something? Sell?
- Example Topics – Brainstorm 3–5 content ideas under this pillar
- CTA Focus – What action should the audience take? (“Comment,” “Click link,” “DM us”)
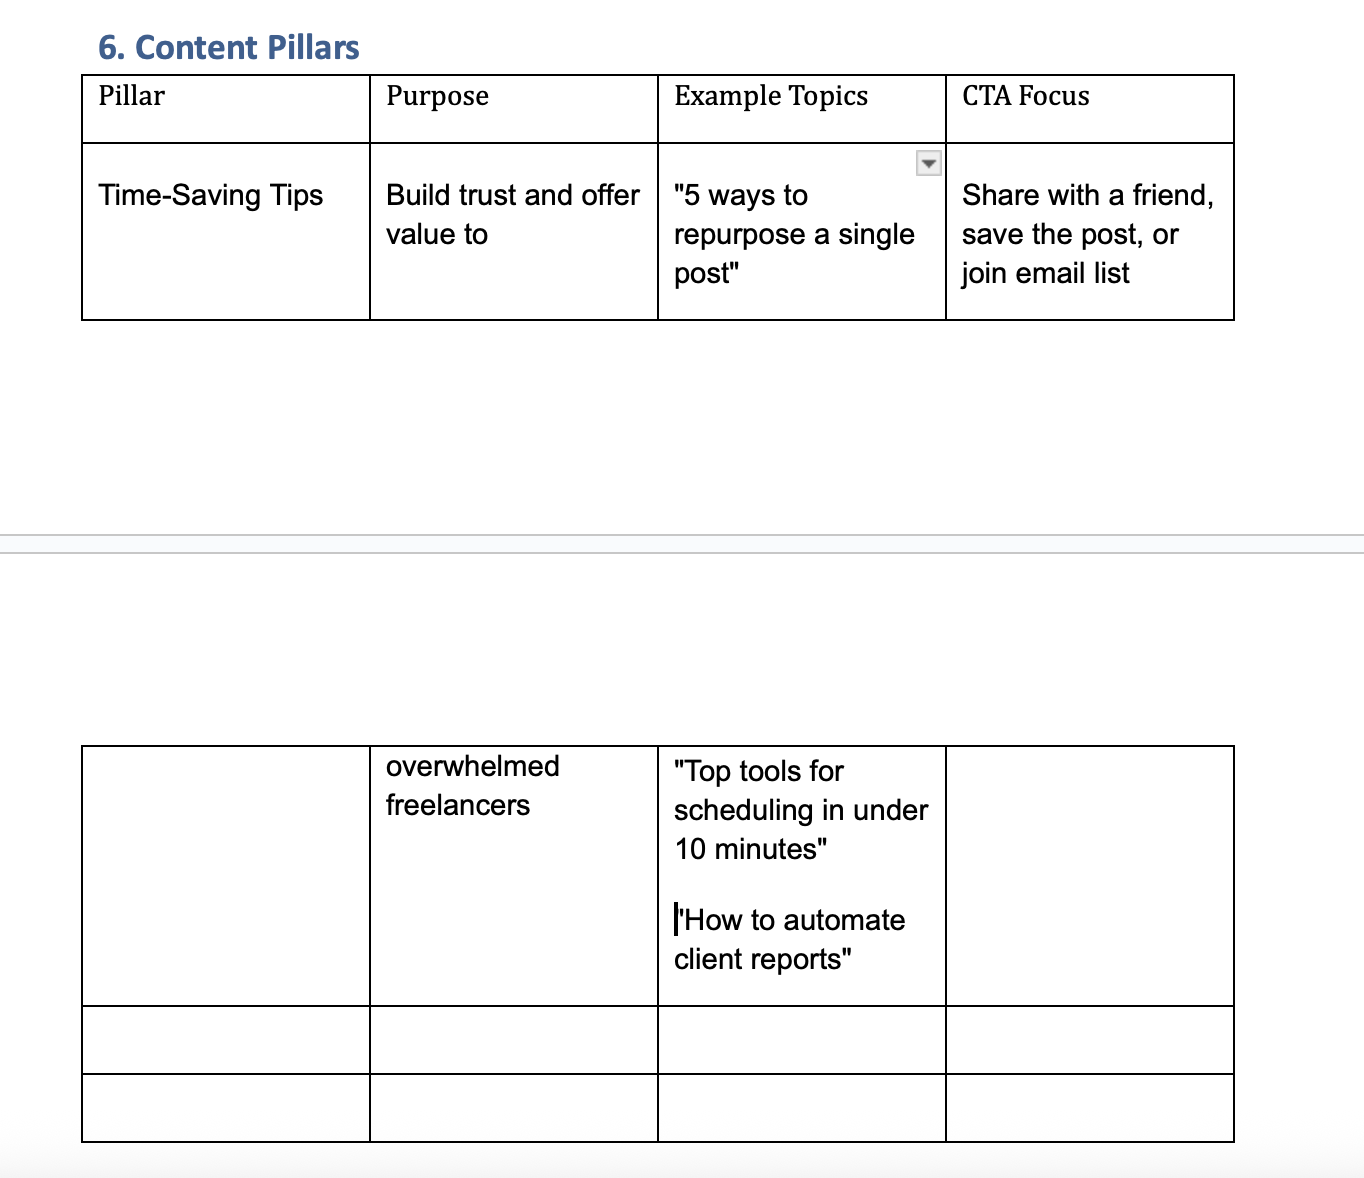
Example pillar:
- Pillar: Time-Saving Tips
- Purpose: Build trust and offer value to overwhelmed freelancers
- Example Topics: "5 ways to repurpose a single post," "Top tools for scheduling in under 10 minutes," "How to automate client reports"
- CTA Focus: Share with a friend, save the post, or join the email list
Here’s what this section will look like when you fill it out:
This is another excellent time to use Content Buckets in Post Planner. Create a Content Bucket for each of your central content pillars, then rotate them through your schedule (as shown above) for an endless feed of fresh and relevant content!
Pro Tip: Use the "one post, multiple formats" rule. If you create one solid idea under a pillar, repurpose it as a Reel, carousel, story, and text post to get more mileage.
7. Plan your posting cadence for each channel
Not all platforms (or audiences) are the same, so your posting cadence shouldn’t be, either.
In this section of the template, you’ll map out how often you’ll post on each platform, what types of content work best there, and when your audience is most active.
The goal? Post smarter, not just more.
Every platform has its own rhythm and timing. What works on Facebook might flop on LinkedIn. Planning your cadence by channel helps you show up consistently without burning out or annoying your audience.
For each social platform you use (Facebook, Instagram, LinkedIn, etc.), fill in the following:
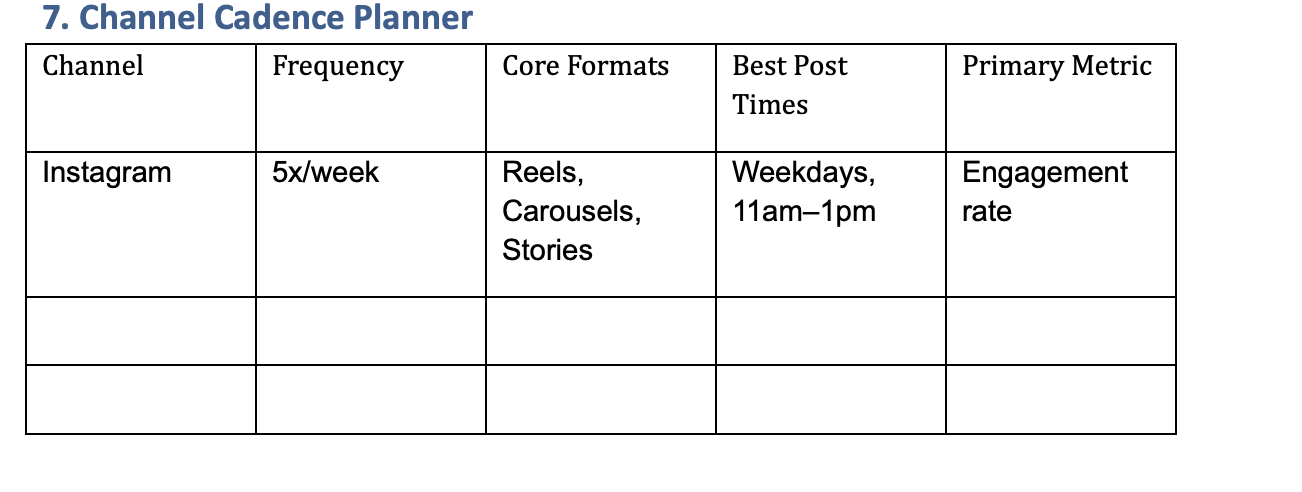
- Channel – The name of the platform
- Frequency – How many times per week (or per day) you'll post
- Core Formats – What types of posts do best here? (Reels, Carousels, Links, Stories)
- Best Post Times – When your audience is most active (based on insights or past performance)
- Primary Metric – What are you optimizing for here? Reach? Clicks? Comments? Follows?
Here’s what it looks like filled out:
Post Planner takes your custom cadence and puts it on autopilot:
- Create a Posting Plan for each social network (or at least one Posting Plan for each group of social networks that will follow the same cadence).
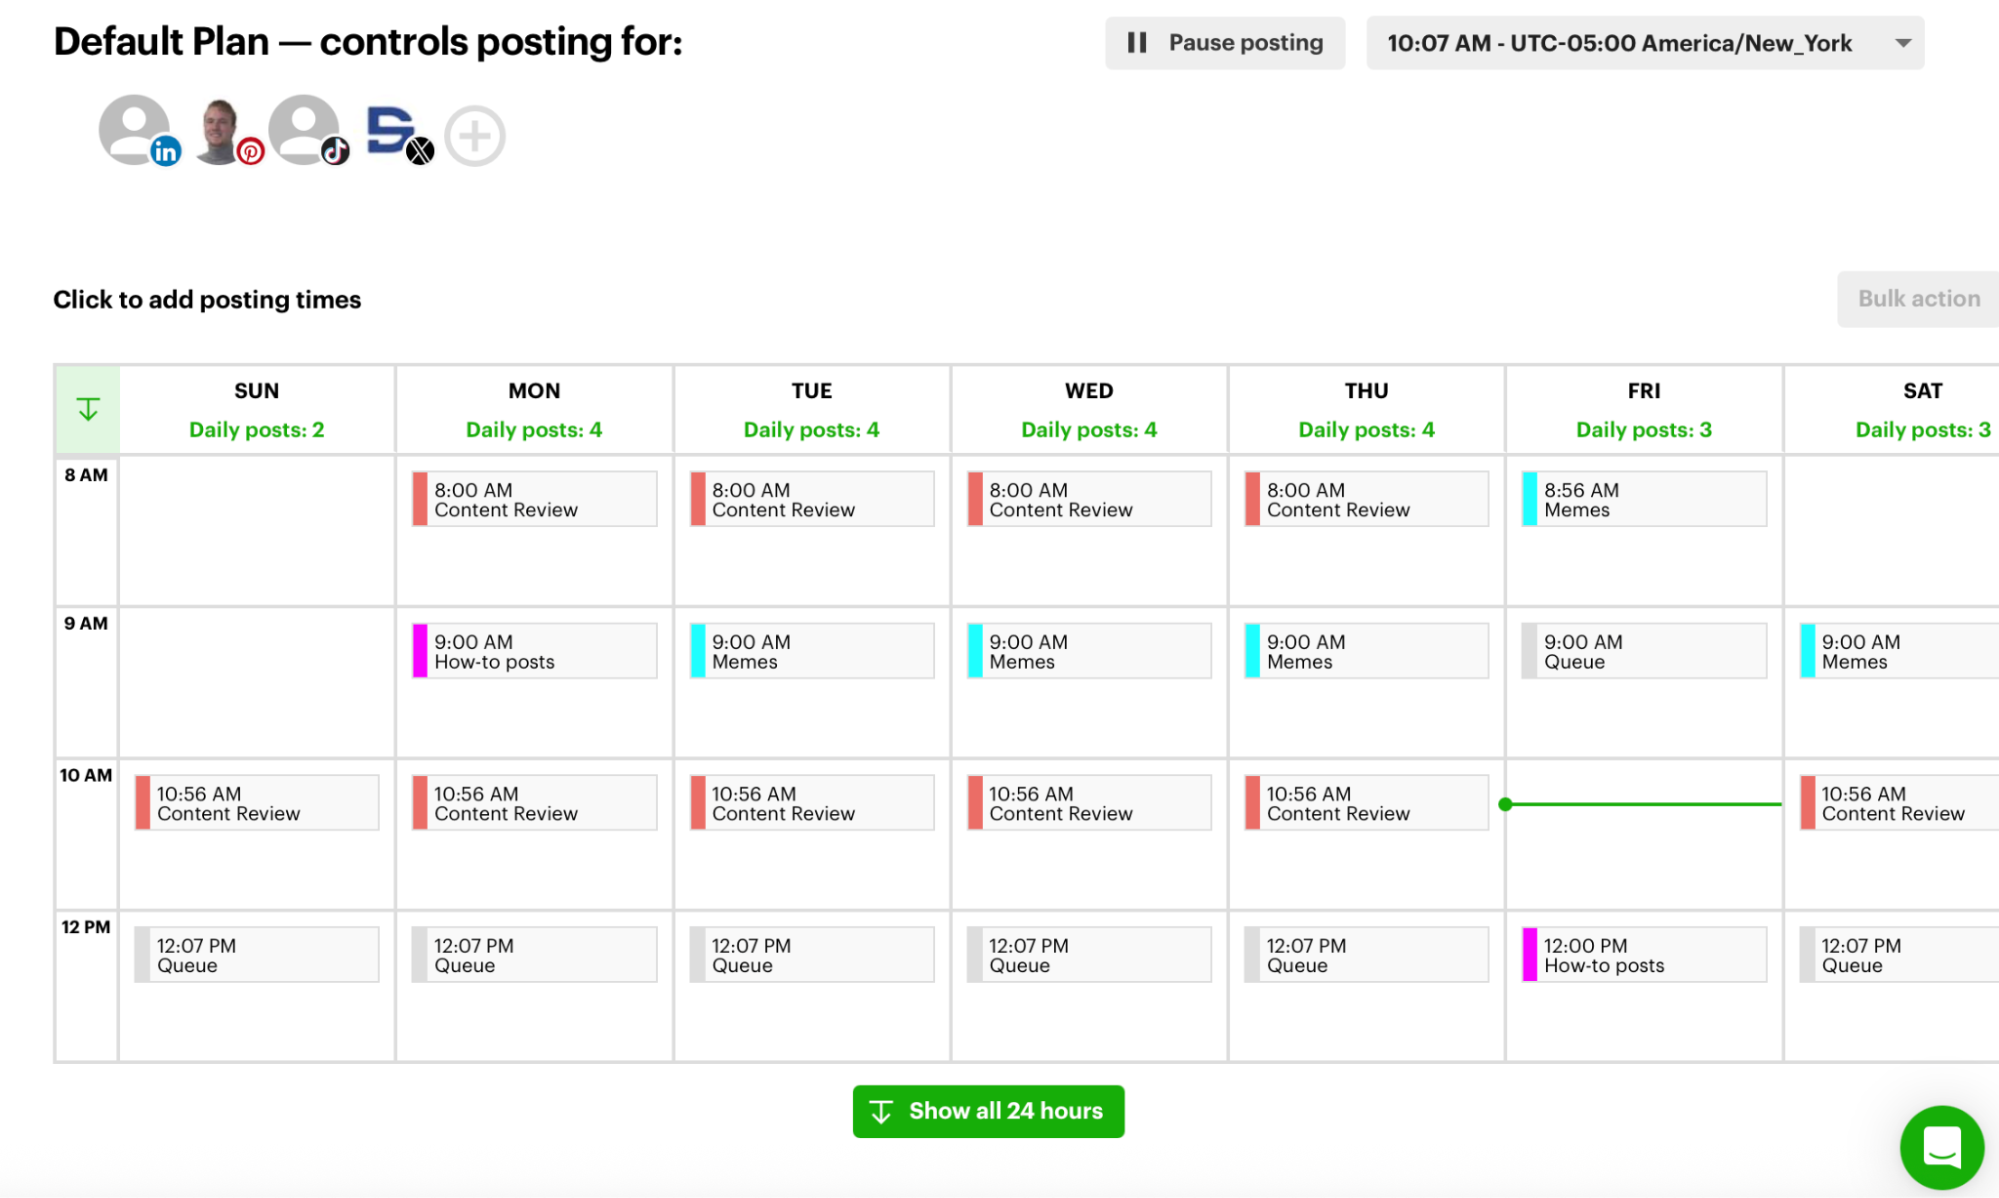
- Fill your Posting Plan with content you source from your Content Streams or that you create yourself.
- View it all at a glance in Calendar View, so you always know what’s going out and when.
- Automatically recycle evergreen content to reduce the amount of new content you need to source or create.
Cadence is where strategy meets consistency. Nail this, and your brand stays top-of-mind without living in your DMs.
Pro Tip: Start small and scale up. It's better to post 3 high-quality times per week than 7 mediocre ones. Then ramp up once you’ve got a system that works.
8. Create your topic × format matrix
You’ve got your content ideas. You’ve got your favorite formats. Now it’s time to cross them.
The topic × format matrix helps you match the what (topics) with the how (formats). This multiplies your content output AND gives your best ideas the reach they deserve across every channel.
Most people create a post and move on.
Smart marketers repurpose every idea across multiple formats to reach different learning styles, preferences, and algorithms. One great tip can become a video, a carousel, a poll, a story, and more (all with minimal extra work).
How to fill it out:
Start by listing your content topics down the left-hand column (these should align with your content pillars). Then, use a simple checkmark to fill in the boxes across each format as you create a post for that topic in each format.
Here’s what it’ll look like when you fill it in:
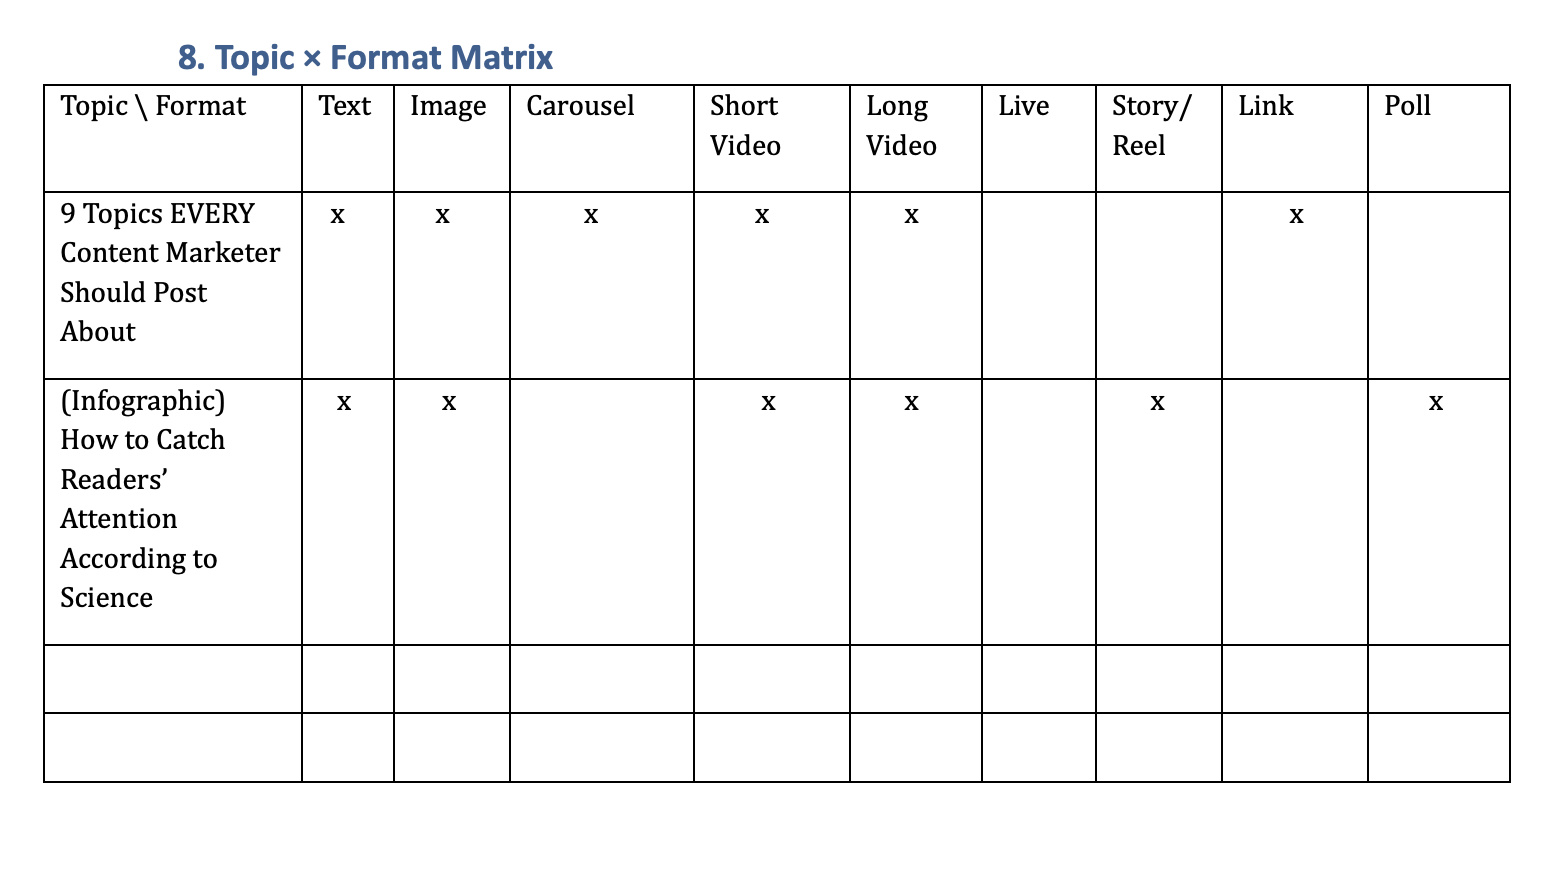
You don’t need to fill in every cell. The goal is to spot which combinations make sense and spark fresh ideas.
Once your matrix is built, Post Planner helps you bring it to life:
- Use the Post Composer to batch-create posts across multiple formats
- Upload all your content at once with bulk scheduling — no need to copy/paste
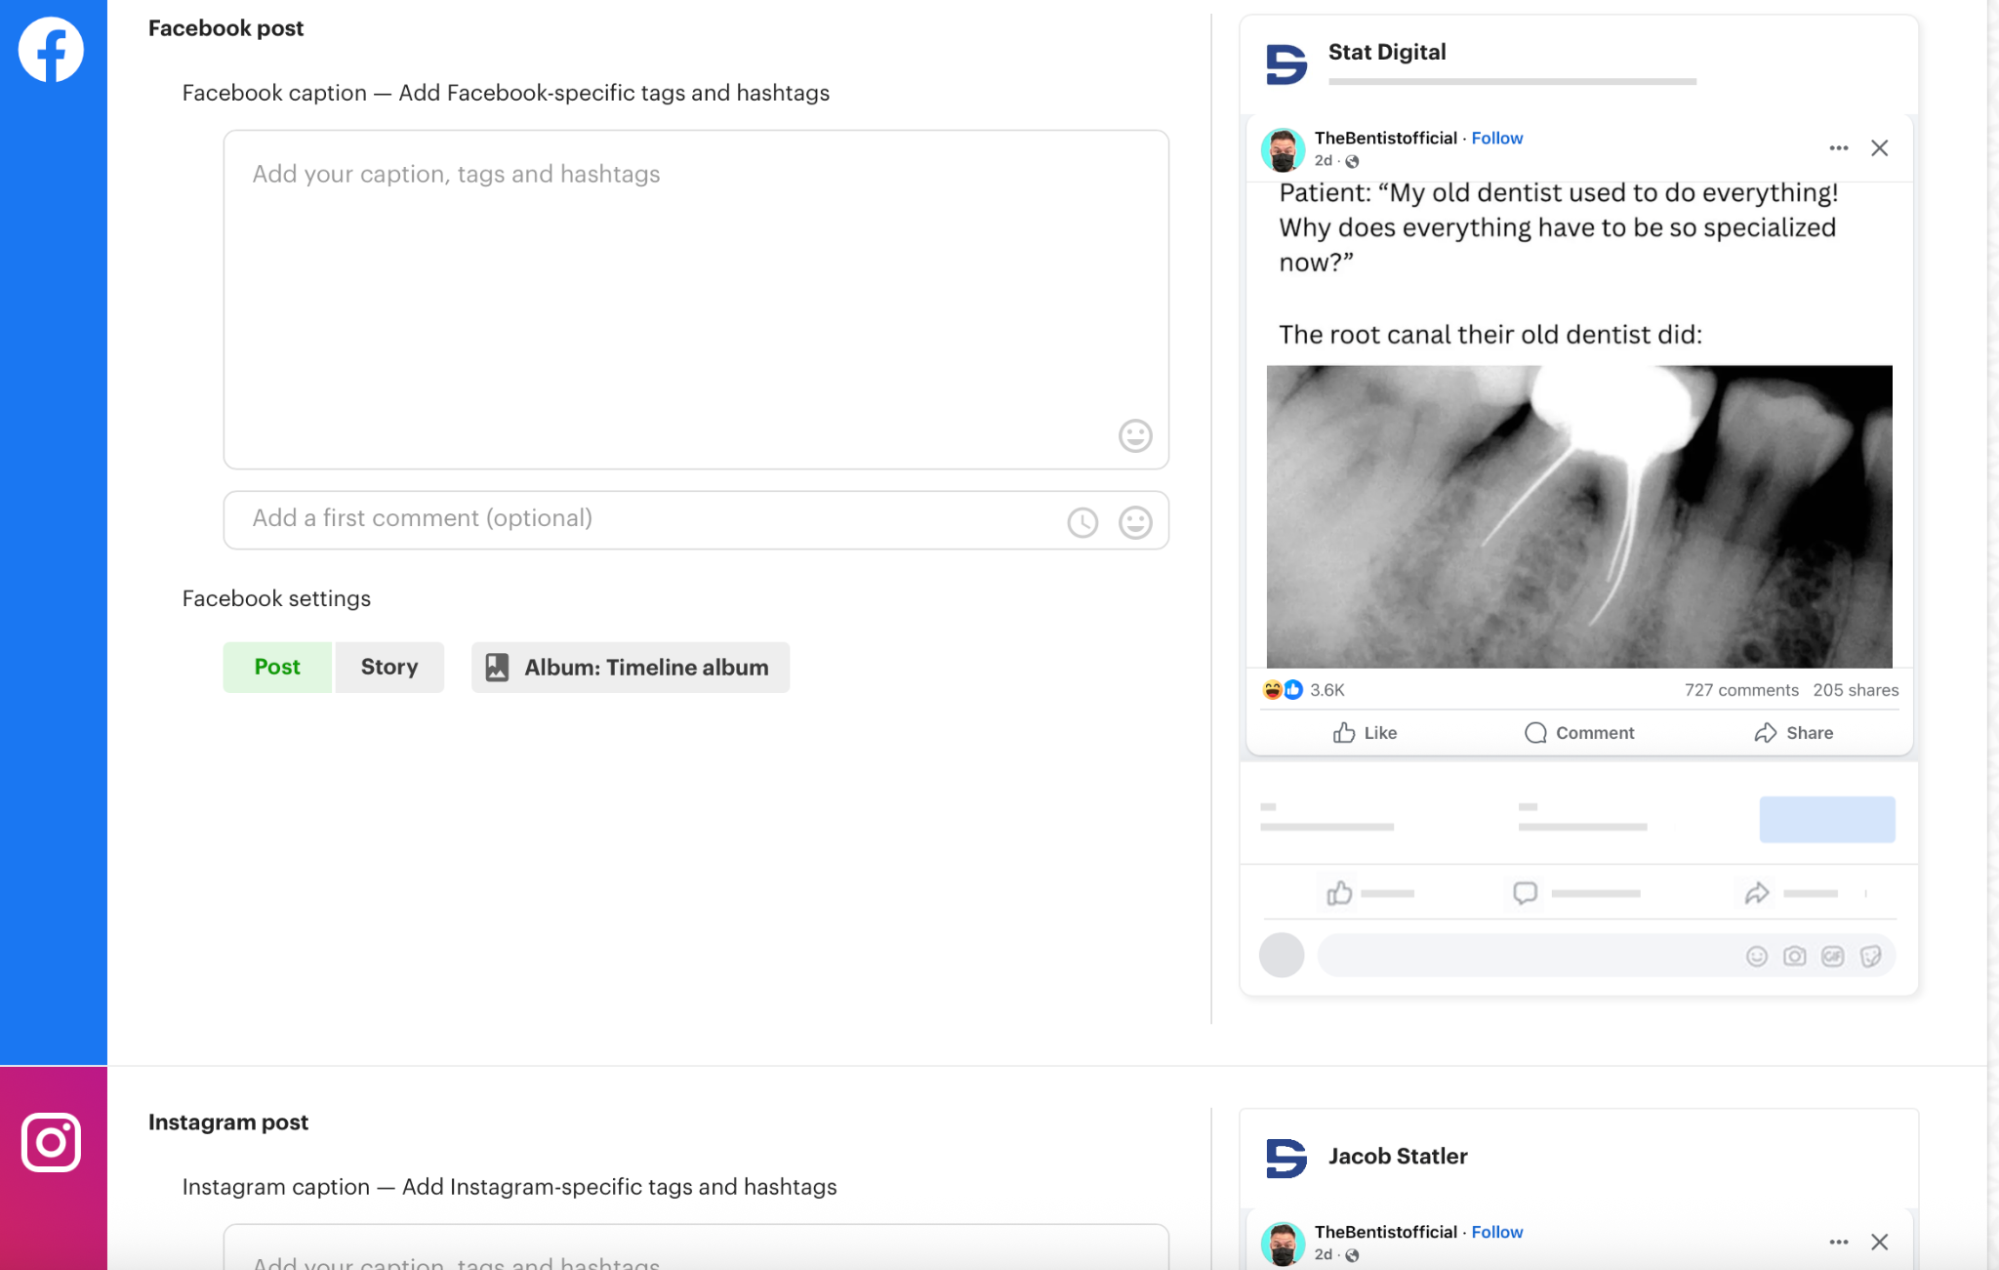
- Organize your post ideas by format and topic inside Buckets
- Track what format is winning on which platform using the History tab
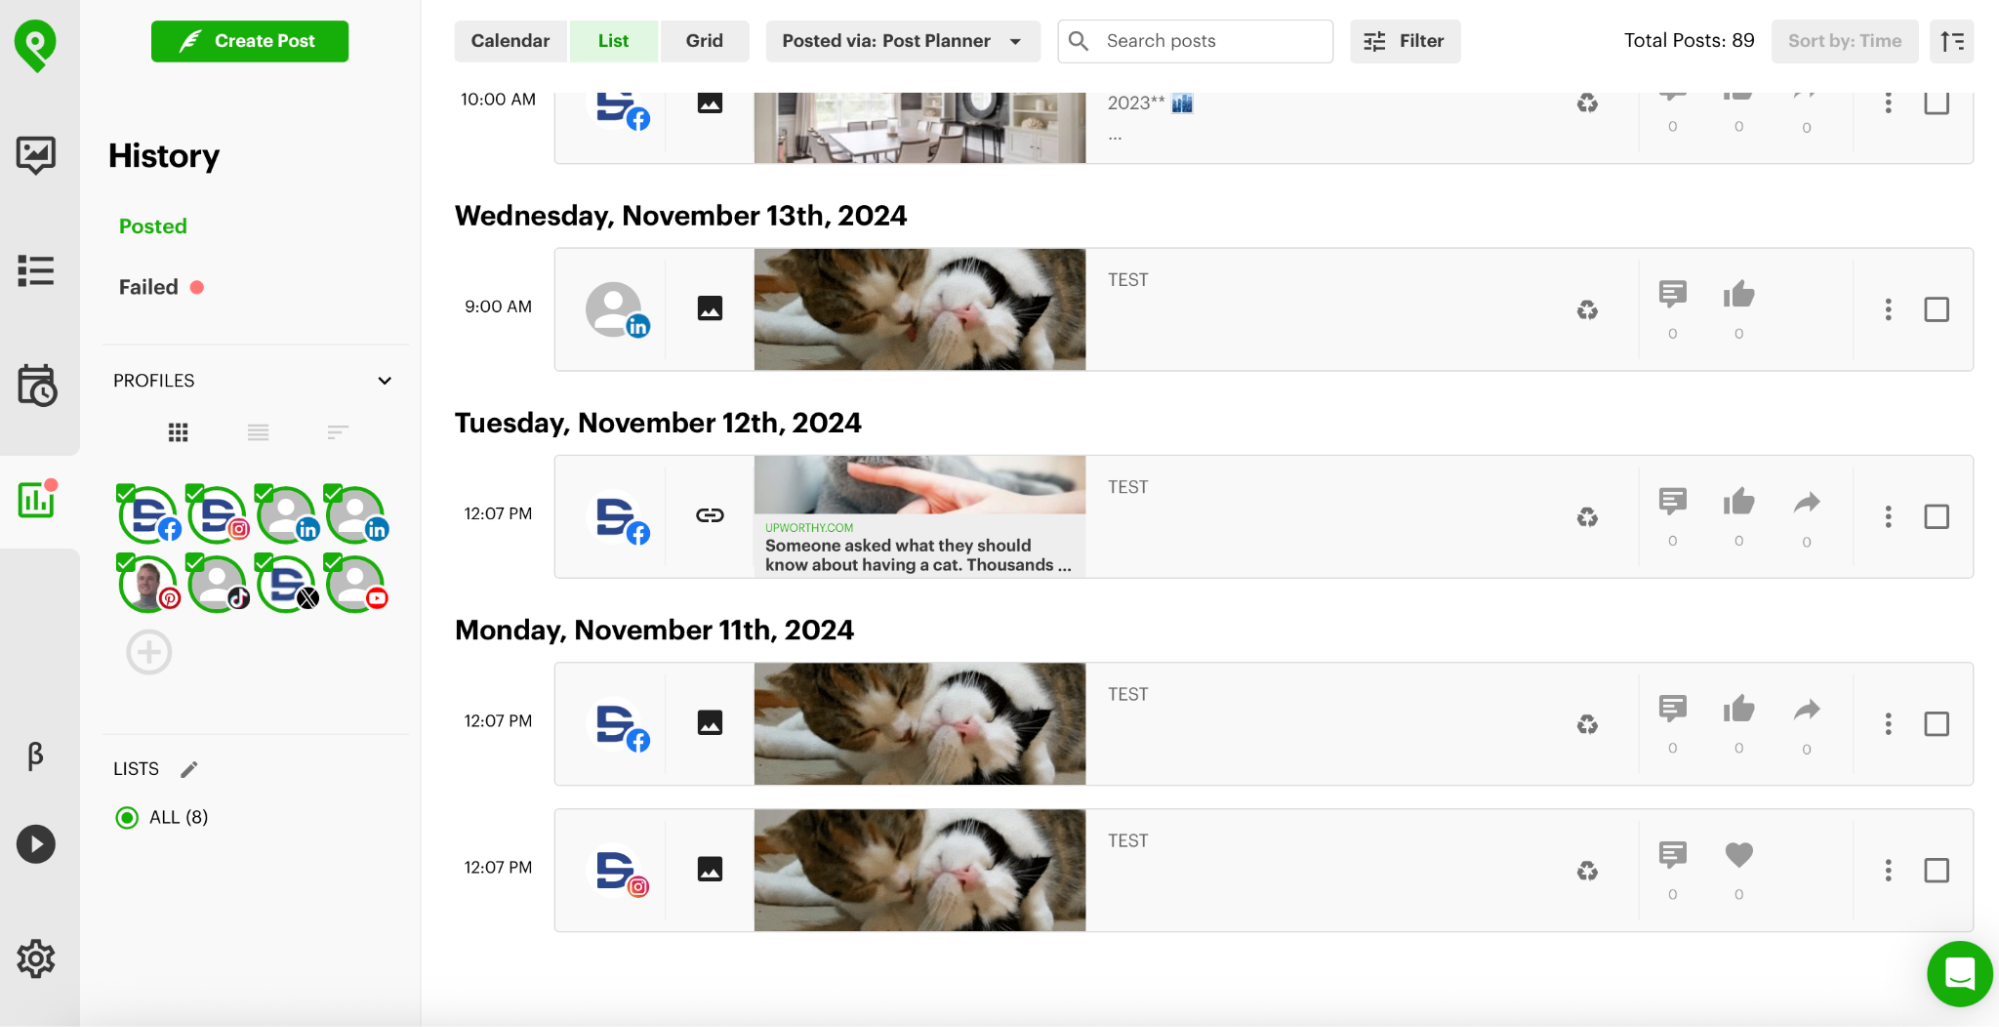
Your matrix becomes your content engine. Just load it up and let Post Planner do the auto-posting.
9. Assign workflow & team responsibilities
Even the best strategy falls apart without clear ownership.
This section of the template outlines your full content workflow and assigns each task to the appropriate person. That way, nothing slips through the cracks, no one’s guessing who does what, and your social media engine runs smooth like butter.

Posting consistently takes more than good ideas. It takes a repeatable system.
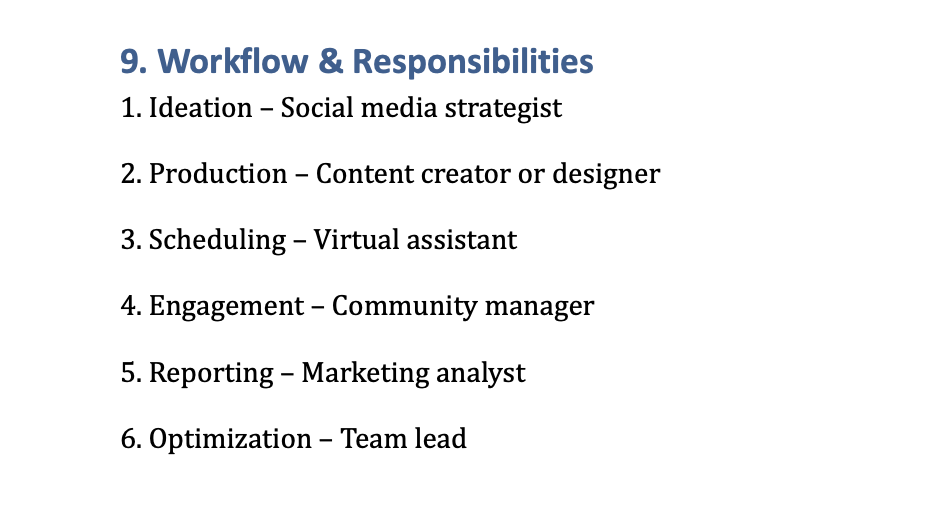
Next to each of the 6 core stages of your social media workflow, list the owner of that particular step.
- Ideation – Who’s responsible for coming up with post ideas and themes?
- Production – Who writes the captions, designs the visuals, or shoots the video?
- Scheduling – Who uploads and queues the content?
- Engagement – Who monitors and replies to comments and DMs?
- Reporting – Who tracks KPIs and shares performance updates?
- Optimization – Who identifies what’s working and makes recommendations for improvements?
10. Use the social profile optimization checklist
This final section ensures that every profile you manage is complete, consistent, and conversion-ready.
It’s a quick checklist, but don’t underestimate it–optimizing your profiles can instantly boost credibility, engagement, and clicks.
You can post great content all day, but if your profile looks messy, unclear, or outdated… you’ll lose followers before they even see your posts. A well-optimized profile builds trust and guides visitors to take action — whether that’s clicking a link, booking a call, or following your brand.
How to use the checklist:
Review each item in the checklist to ensure it's complete on every platform.
- Handle & page name are consistent across channels
→ Keep your brand easy to find. Use the same name, spelling, and formatting on Instagram, LinkedIn, Facebook, etc. - High-res logo avatar fits crop shapes
→ Test how your profile photo looks in a circle, square, and tiny size. It should always be clear and legible. - Bio includes UVP (unique value proposition) and one clear CTA link
→ What do you do? Who do you serve? What should visitors do next? Keep it short and powerful. - Contact buttons enabled (email/DM)
→ Make it easy for people to get in touch, especially if you offer services or run a local business. - Pinned post shows flagship content or offer
→ Use this real estate to highlight your best offer, your origin story, or a viral hit post. - Alt-text for profile images
→ Boost accessibility and SEO by adding descriptive alt-text to your images where platforms allow. - Location, hours, and categories accurate
→ Especially important for local businesses to make it as easy as possible for customers to find you. - Review & update every quarter
→ Set a calendar reminder. Platforms and priorities change—your profile should evolve too.
FAQ
How do you implement a social media strategy?
The best way to implement a social media strategy is to work through a template like the one provided in this article. It provides all the critical details in an easy-to-use format, enabling you to quickly and confidently get started.
What is a social media strategy template?
A social media strategy template is a pre-made outline of all the key aspects of a social media strategy. It helps reduce the number of things you have to think about by providing a clear roadmap from zero to a fully functional social media strategy.
What are social media templates used for?
Social media strategy templates are used to accelerate the process of planning a business’s social media goals and direction. They should also help users plan their content and align it with their brand’s values and mission.
Conclusion
Ready to put your strategy into action?
Once you’ve filled out the template, the next step is simple: start scheduling smarter. With Post Planner, you can turn your new plan into real results WITHOUT spending hours on content creation or jumping between platforms.
Create your FREE Post Planner account today and start building your content calendar, organizing your buckets, and automating your posts all in one place.
Good luck!


No Comments