Trying to stay consistent on social media without a content schedule is a recipe for burnout.
You end up scrambling for post ideas, missing opportunities, and ghosting your audience whenever life gets busy. That’s why a good social media schedule template can be a total game-changer — it gives you structure, saves you time, and keeps your content aligned with your goals.
Looking for the best social media schedule template on the internet?
Download our free social media schedule template using the form above!
But let’s be real: spreadsheets still come with baggage. They won’t post your content for you. They don’t track performance automatically. And you’re stuck copying and pasting into social media platforms anyway.
That’s where Post Planner comes in — an automated social media scheduling tool — but more on that later.
Here’s how to get the most out of the free template you can start using right now:
- Why you probably shouldn’t use a spreadsheet
- Step #1: Plan out your monthly planner with campaigns, themes, and goals
- Step #2: Brainstorm your post ideas
- Step #3: Add helpful content resources to your Content Repository
- Step #4: Configure your dropdown lists
- Step #5: Schedule your daily social media posts
- Ready to start scheduling and automating your social media?
Why you probably shouldn’t use a spreadsheet
Spreadsheets can help you organize your content, but they come with serious limits.
Here’s what most marketers run into when relying on a spreadsheet to plan and schedule posts:
- You still have to manually copy and paste every post into a scheduler.
- You can't preview your content or design visuals in the same place.
- You have to track engagement metrics by hand (if you even remember to).
It's a lot of friction for a workflow that’s supposed to save you time.
That’s why we built Post Planner — a dynamic, all-in-one tool that helps you plan, create, schedule, and post content across all your social channels. No extra tabs, no messy copy/paste. And yes, you can sign up completely free.
Check out this demo to see how easy it is to use:
You’ll get everything the spreadsheet offers… PLUS, content creation tools, automated publishing, performance tracking, and MORE.
But if you’re not ready to make the switch just yet, don’t worry. The rest of this article will show you exactly how to make the most of our free spreadsheet template.
Step #1: Plan out your monthly planner with campaigns, themes, and goals
Before you schedule a single post, zoom out.
The "Monthly Planner" tab is where you map the big picture — the campaigns, themes, and goals that give your content direction. Instead of winging it week to week, this sheet helps you make intentional decisions that align with your business objectives.

Here's how to use it:
- In the color-coded key at the top right, list your core content categories. These might include things like product launches, holidays, promotions, or content repurposing.
- Under each week, plug in the key focus areas. Maybe week one is about promoting a new blog post, week two spotlights a customer success story, and week three is all about a seasonal sale.
- Make sure every week ties back to a specific goal — whether it's driving traffic, boosting engagement, or growing your list.
This bird’s-eye view keeps your content calendar focused, balanced, and aligned with your marketing priorities.
Step #2: Brainstorm your post ideas
Once you’ve mapped your monthly themes, it’s time to fill in the blanks with actual post ideas.
The "Post Ideas" tab is your creative playground. It’s where you capture every spark of inspiration, like current trending topics or a clever headline you came up with in the shower.

Here’s how to use each column:
- Platform – Choose where the idea fits best. Some content works great on LinkedIn but might flop on Instagram.
- Topic – Write a working title/hook or quick description. Think of it like a headline-in-progress.
- Source to Tag – If you’re curating from another creator or site, add them here so you remember to give credit.
- Link / Short Link – Paste in the original URL or a short link you’ll drop into the post later.
Don’t overthink it — this is just your idea bank. Get your thoughts out now, polish later.
Pro tip: Filter the platform column to quickly build post batches by channel. It makes bulk scheduling way easier later on.
Step #3: Add helpful content resources to your Content Repository
Stop reinventing the wheel every time you need a post.
The "Content Repository" tab is your stash of valuable, reusable content. This is where you store evergreen blog posts, lead magnets, templates, videos, case studies, and more. It's like a shortcut folder for your best-performing assets.

Here’s how to fill it out:
- Content Type – Label what kind of asset it is (blog, checklist, freebie, video, etc.).
- Title – Give the content a clear name so it's easy to spot later.
- Description – Write a quick summary so you remember what the asset is about.
- Link – Drop in the URL or location of the content.
- Date Added – Keep track of when you added it to the repository.
- Author – Useful for tagging or crediting when you repurpose.
- Status/Notes – Use this to mark if the asset’s approved, needs updating, or worked well on certain platforms.
Want to surface hidden gems? Use filters to find content that hasn’t been shared in a while. This makes it easy to repurpose high-value assets without repeating yourself too often.
Pro tip: When you build a new campaign, start by checking your content repository. You might already have half the pieces done.
Step #4: Configure your dropdown lists
Before you start scheduling content, make sure your dropdowns match how you actually work.
The "Hidden Lists" sheet (tucked away at the far right) controls all the dropdown menus throughout the template. If you don’t see it, go to View → Hidden sheets → Hidden Lists to unhide it.
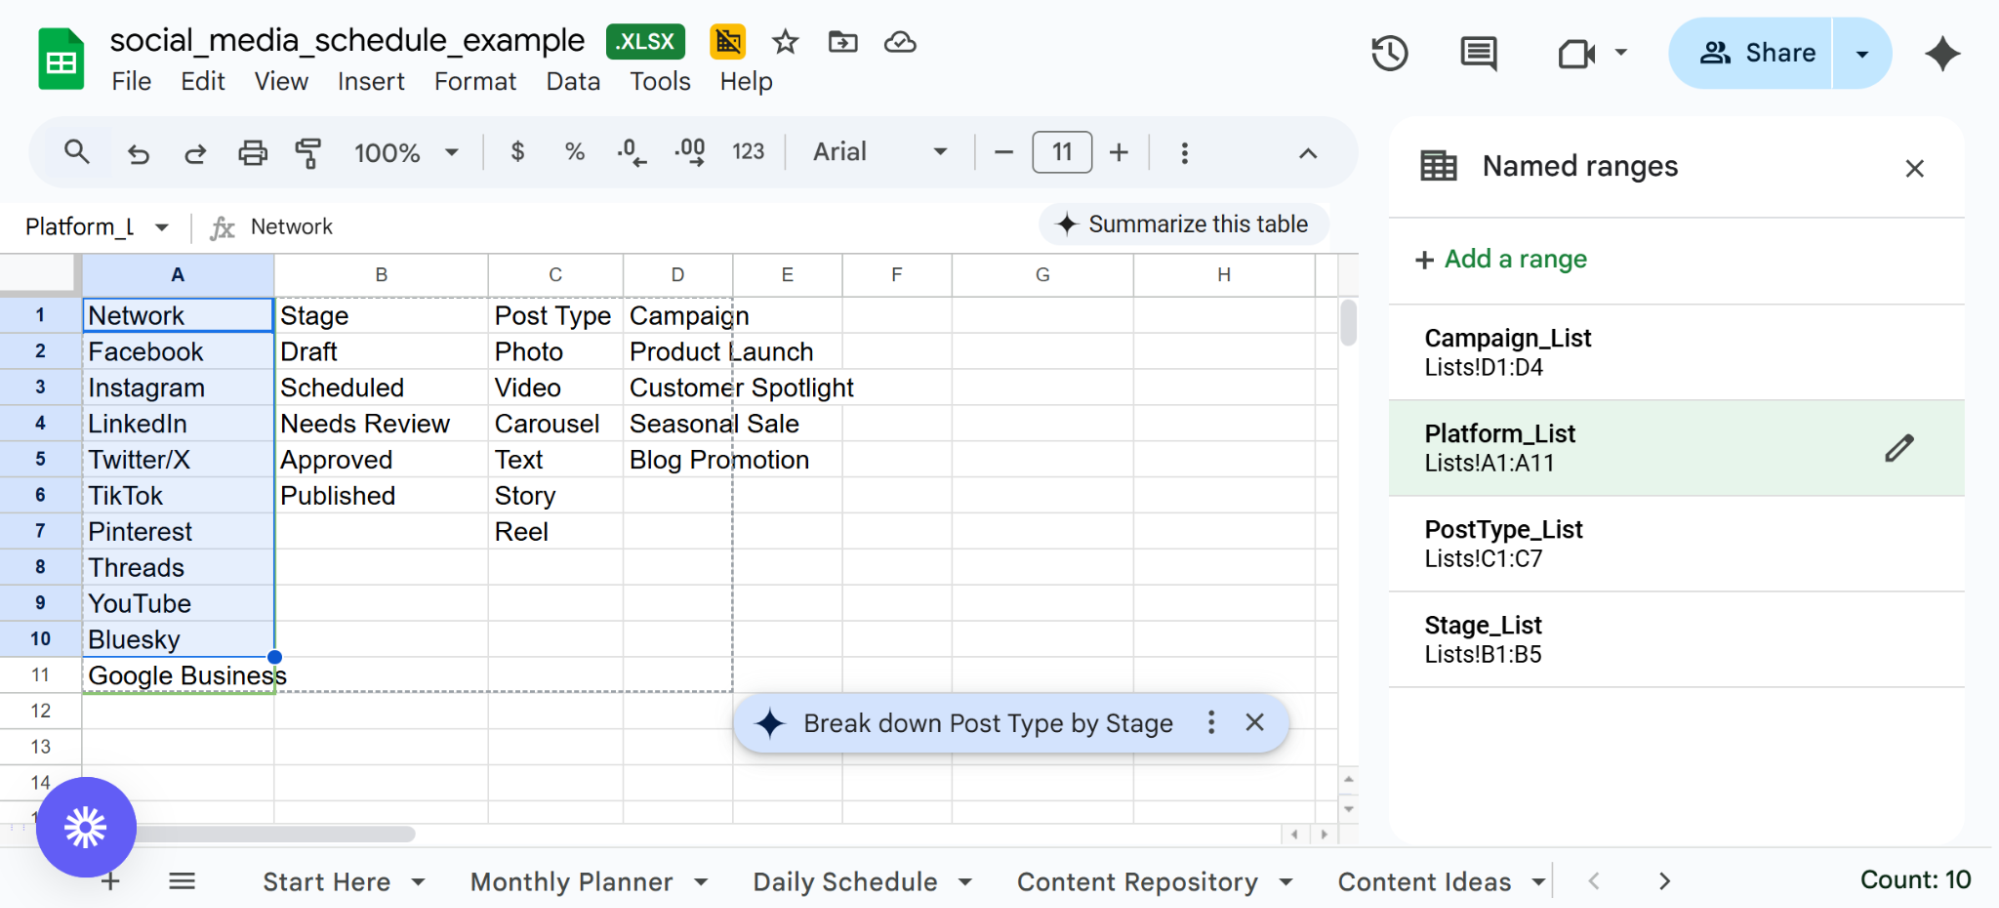
This is where you can customize:
- Networks – Add or remove social platforms you use.
- Post Types – Define formats like carousel, reel, story, blog, etc.
Stages & Statuses – Set up your workflow steps (Draft, In Review, Scheduled, Published). - Campaign Names – List your active campaigns for easier filtering later.
Edit the list of your choice directly in the cells. If you add more options to a list, extend the data range by going → Data → Named Ranges → Edit.
Once everything’s tailored to your needs, re-hide the sheet to keep things clean and prevent accidental edits.
Keep the lists short and consistent. The cleaner your dropdowns, the easier it’ll be to sort, filter, and stay organized later on.
Step #5: Schedule your daily social media posts
Once your ideas are ready, it's time to turn them into actual scheduled posts.
The "Daily Schedule" tab is your command center — a clean, organized view of everything going out each day. You can use it solo or with a team, and it's flexible enough to support any platform or content mix.

Here’s how to fill it out:
|
Column |
What to enter |
Tips |
|
Copy |
Write the full caption or text |
Use paragraph breaks with Ctrl + Enter (⌘ + Enter on Mac) |
|
Media |
Paste the filename or media type (Image Link, GIF, Video_001.mp4) |
Store files in Drive or Dropbox and paste a shared link |
|
Date / Time |
Set your publish date and local time |
Use either 24-hour or am/pm format, but stay consistent |
|
Link |
Add the destination URL or a UTMed tracking link |
Use a shortener if you're tight on characters |
|
Campaign |
Choose from the Campaign dropdown (auto-filled from Hidden Lists) |
Campaign colors will show up in the Monthly Planner |
|
Network |
Select the social platform (FB, IG, LI, etc.) |
This automatically colors the row header for easy scanning |
|
Account |
Specify which brand or client account it’s for |
Especially useful if you manage multiple handles |
|
Stage |
Mark where the post is in your workflow |
Options like Brainstorm, Draft, In Review, Approved, and Scheduled help your team stay aligned |
|
Collab Notes |
Add internal notes or tag teammates (e.g., @Mia please design IG Reel cover) |
Use for async teamwork |
|
KPIs |
After publishing, enter metrics or formulas (e.g., =I3/G3) |
Helps you track performance without leaving the sheet |
Color-coding and dropdowns keep this sheet from getting messy. Once you're in a groove, you can schedule weeks of content in one sitting.
Ready to start scheduling and automating your social media?
This template is a great start. But if you want to skip the manual work and start publishing posts automatically, try Post Planner for free. You’ll be able to plan, design, and schedule content across all your channels in one place, no spreadsheets required.


No Comments