

 Are you running multiple ads campaigns on Facebook?
Then you need learn how to use Power Editor!
Power Editor is an advanced tool that helps businesses efficiently manage multiple ads campaigns on Facebook.
It's packed with more powerful features than the Ad Manager. And many top Facebook page managers recommend Power Editor over the Ads Manager.
Yes, learning to use Power Editor can be terrifying at first. But small business owners don't have to know it all.
>> Click to Tweet <<
In this post, I explain the most common, useful features small biz owners need to know to use Power Editor on their own.
These features include:
- Campaigns, Ad Sets & Ads (and how to set them up)
- Saved Audiences
- Custom Audiences
- Unpublished Posts
Let's get started!
Facebook Power Editor: A Step-by-Step Guide for Newbies (Like You)
The Facebook campaign structure consists of:
- Campaigns
- Ad sets
- Ads
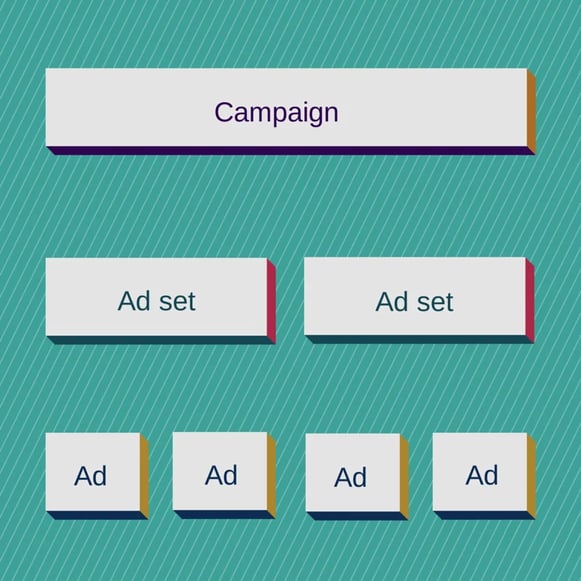
Campaigns
A campaign is at the top level of the campaign structure. Each campaign can contain several ad sets -- and each ad set can contain several ads.
According to Facebook, you can create up to 1,000 campaigns, ad sets & 5000 ads per ad account.
[EDITED: 5000 instead of 1000 ads per ad set, as correctly pointed out by Daniel from Facebook in the comments below]
At the campaign level, you set your advertising objective. You can currently choose from these 9 objectives:
- Clicks to website
- Website conversions
- Page post engagement
- Page Likes
- App installs
- App engagement
- Offer claims
- Event responses
- Video views
How to Set Up Campaigns
Creating a new campaign using Power Editor is simple.
First, select “Manage Ads” from the dropdown menu at the top left of the page:

Next, select the “Campaigns” tab as shown below:

Then, click the “+” button to start creating your campaign.

A popup should appear like the screenshot below.
Give your campaign a name – preferably a name that describes the objective of your campaign – and select your ad objective from the dropdown menu. Leave the buying type as “auction” and you’re good to go!

Ad Sets
With Facebook’s latest updates to the campaign structure, the ad-set level has become more complicated.
When you create an ad set, you need to determine the following things:
1. Ad schedule
Apart from setting the start & end dates for an ad set, you can also choose to run the ad set for specific times during the day & week.
2. Ad budget
You can choose how much you want to spend on each ad set & choose to set a daily or lifetime budget. If you choose a lifetime budget, Facebook divides the budget into equal parts depending on how long you run the ad set.
3. Ad bidding
Before the recent update, you could bid for ad spaces using either Cost per Mille (CPM), Cost per Click (CPC), or optimized Cost per Mille (oCPM). The recent update replaced oCPM with 2 new options -- Post Engagement & Daily Unique Reach.
With Post Engagement, you can bid to show your ads more often to people who are most likely to engage with your ads, even if they're shown the same ad more than once.
With Daily Unique Reach, you'll only show an ad to each person once, so that you can reach as many people as your budget allows.
4. Ad targeting
The shift of ad targeting from the ad level to the ad-set level means that each ad set will only target one group of people, and all the ads inside an ad set will reach the same group of people.
This makes ad sets even more important & convenient since you can easily run A/B experiments on your targeting options without needing to change your ad image & copy.
5. Ad placement
With ad placement, you can choose whether to show your ads in the desktop news feed, mobile news feed, desktop right column or partner mobile apps. However, the ability to place your ad on partner mobile apps depends on your advertising objective.
In general, Facebook does not allow you to advertise on partner mobile apps if your advertising objective is to:
- Gain new page Likes
- Increase post engagement
- Install or engage with a desktop app
- Claim a Facebook offer
- Respond to an event
- View a video.
How to Set Up Ad Sets
First, select the campaign that you want to create your ad sets in & click “View Ad Sets” at the top right.

Then, click the “+” button on the left to create your ad set.

A popup like the screenshot above should appear. Check the “Use Existing” option to create the ad set inside the campaign you just created. Then, give your ad set a name.
I usually test the effectiveness of different Facebook target audiences first, so I named my ad sets after the target audiences.

Once you’re done, click the “Create” button at the bottom left.
Then you’ll see a section like what we described earlier. You can set your ad budget, schedule, targeting option, placement & bidding option here.

Ads
Finally, at the ad level, all you need to do is design your ad creative.
In Facebook’s terms, this means that you write your copy & choose an image.
It’s that simple!

How to Set Up Ads
Here's how to create an ad. First, select the ad set you want to create your ads in & click “View Ads”.

Then, just like before, click the “+” button to create the ad. A popup should appear.

Like the ad set, make sure to check “Use Existing” in both campaign & ad set to use those you have already created. Then, give your ad a name, preferably a systematic naming method that helps you track the changes you make to each ad.
For example, I use “v1.0” -- v1, v2, v3 and so on track changes in my image. And v1.1, v1.2, v1.3 and so on track changes in the copy I write.
Choose what works for you!

Now that you understand how Facebook ads are structured, let’s look at some handy features that Power Editor has that will make your life so much better!
Saved Audiences
As the name suggests, Saved Audiences is a feature within Power Editor that lets you create & save a target audience.

When you set up an ad, choosing a target audience can be really painful -- especially if you want to target a very specific group of people with several qualities!
For example, you might need to choose:
- United States
- Age 24 – 45
- Females
- And other demographic options, such as:
- Relationship status
- Education qualifications
- Work
- Financial status
- Home type, ownership, value & household composition
- Ethnic affinity
- Generation
- Parents or moms
- Political views (applicable only for US)
- Life events
- Advanced connection targeting, such as fans of your page, non-fans of your page & friends of fans
- English
- iPhone 6 Plus user
Luckily, with Saved Audiences, you experience this pain only once.
Once you set it up, you can simply re-use the same saved audience for each ad set by typing it into the first textbox at the top of the popup.

How to Set Up Saved Audiences
Setting up & organizing your saved audiences is easy.
First, click “Audiences” on the dropdown menu as shown in the screenshot below.

Next, click “Create Audience” and select “Saved Target Group” from the dropdown menu.

A box should appear below so you can fill up the empty fields to create your target audience.

To save your target audience, click the green “Upload Changes” button.

Don’t forget to do this whenever you make changes to your campaign in Power Editor so you don't lose all the changes!
Custom Audiences
Custom audiences are very powerful because they allow you to reach a highly relevant group of people using your data.
You can reach special groups of people such as your mailing list subscribers, current client list, potential customers, mobile app users & more.
Since 2012, many businesses have reported significantly improved conversion rates when they use custom audiences over traditional targeting options such as interests & behaviors.
My favorite custom audience is the Website Custom Audience (WCA).
WCA lets you track your website visitors who are also on Facebook, giving you the powerful ability to reach users based on which part of your website they visited.
Some of my favorite WCA options include:
- People Who Visited Specific Blog Posts: I promote certain pieces of my content on Facebook from time to time. But before I do that, I will post them to my Facebook page & share the material across other social media channels & with my email subscribers. Tracking who visited my blog posts lets me to exclude people from my ad campaign -- saving me precious ad dollars.
- People Who Visited My “About” Page: I track visitors to my “About” page because they show an interest in who I am, what I do, and possibly what my services are. As a result, I like to target these visitors using Page Like ads, to invite them to connect with me on my Facebook page.
- People Who Visited a Landing Page for a Lead Magnet, such as an eBook or a Free Webinar: If you’re familiar with Google ads, you might know about retargeting. Retargeting is an effective method to reach out to leads who didn't make a purchase or in this case, sign up despite your lead magnet. I retarget such users in 2 ways, which you will see in the next point.
- People Who Signed Up for the Lead Magnet: By tracking people who visited your landing page for a lead magnet & who signed up, you can either retarget those who did not sign up to offer them another chance to do so or target those who signed up to buy your product.
- People Who Visited a Landing Page for a Paid Product: This is similar to #3, except that you're trying to reach a potential customer.
- People Who Bought a Product: This is similar to the combined concept of #3 and #4, where you retarget non-buyers to buy your product by offering a limited discount or reach buyers to offer them something more, like selling a related accessory to complement the product they just bought.

How to Set Up Custom Audiences
You can set up custom audiences from the same place you set up saved audiences.
In case you've forgotten, click “Audiences” on the dropdown menu as shown in the screenshot below:

Then click “Create Audience” and select “Custom Audience”. As usual, a popup should appear!

Depending on which data you have, you can choose the option that fits yours best.
For example, if you have an excel sheet of your customers’ emails, you can upload it to Facebook by choosing “Data File Custom Audience”.
For the purpose of this guide, we'll choose “Custom Audience from your Website” -- especially since this is also more difficult.

You should see a code snippet next.
If you’re familiar with basic code, you can copy & paste the snippet within the <head> and </head> sections in your .php file. You can also send the snippet to your developer’s email by clicking “Send the code to your website developer” (as shown in the screenshot above).
Next, click “Create Audience”.

Tick the checkbox to proceed. Then, click “Create Audience”.

Finally, you can create your website custom audience.

Finally, you can create your website custom audience.
To begin, I'll create an audience for all website visitors & name it “Website Visitors”. As with the naming systems we discussed earlier, I advise you to choose one that tells you exactly who they are.
Next, choose to track very specific kinds of website traffic.
For this example, I'll choose “Anyone who visits your website”. But there are many other powerful options -- including:
- People who visit specific web pages -- such as your blog posts
- People who visit specific web pages but not others -- such as people who visited your product landing page but not your “thank you” page
- People who haven’t visited in a certain amount of time -- for example, 2 weeks since you launched a promotion but these people have neither bought your product nor re-visited your website
- Any custom combination of the above -- such as people who visited 2 of your landing page variants but haven't bought any of your products in the last month
Unpublished Posts
As the name suggests, unpublished posts are posts that users cannot see unless you show the posts to them in an ad.
Some of you know these as “dark” posts, a phrase used by Jon Loomer -- a popular Facebook marketing coach.
Unpublished posts are no doubt one of the most useful features around because they let you test multiple Facebook posts with a smaller group of people -- without showing them to everyone.
With unpublished posts, you also get to “post” more things & show more of your content to your fans & other target audiences without having to flood your page Timeline.
How to Create an Unpublished Post
Creating an unpublished post is easy. First, go back to where you were earlier when you created an ad.
Then, tick the option “Create new or edit” as seen in the screenshot below.

Next, fill in the empty fields where you need to.

To create a link post, fill in every section.
Choosing a Call To Action is optional. I encourage you to create 2 variants, one where you pick a suitable Call To Action & one without a CTA.
To create an image post, fill in only the Text section & select the image you'd like to use. To create a text post, fill in only the Text section.
Don't forget to upload changes when you finish!
Conclusion
Understanding the campaign structure is key to creating & managing Facebook ads -- especially when you go beyond buying ads for page Likes & post engagement to driving website clicks & conversions.
>> Click to Tweet <<
Because you're asking more from your target audiences, you'll find yourself needing to create more ads to run multiple experiments to find out what works best for you.
Power Editor is the right tool to do that because it's designed for heavy usage of ads. And to scale your ad campaign means that you should create & manage your ads in a very systematic & clear manner.
I also shared 3 common features that I use in the Power Editor when creating ads.
You can create custom audiences through the Ads Manager -- but you'll find more advanced & powerful features in the Power Editor (such as saved audiences & unpublished posts).
I hope this guide helps you take the first step in using Power Editor to create & manage your ad campaigns.
If you have any questions about Power Editor, please comment below!


ViewHide comments (3)